Gauge

Golbat (20%)

Crobat (20%)

6 (Pattern 3)
Geodude (19%)
Golem (1%)

Typhlosion (5%)


Ursaring (20%)

1 (Patterns 3 & 4)
Teddiursa (20%)

Poochyena (20%)

4 (Pattern 3)
5 (Pattern 4)
Hariyama (20%)

Bastiodon (20%)

Toxicroak (20%)
Check out WarriorGallade's post on this Mission for more specific tips.
| Rank | AP | Slates |
|---|---|---|
| S | 40 | Pupitar (90%) Tyranitar (10%) |
| A | 30 | Larvitar (100%) |
| B | 20 | N/A |
| C | 16 | N/A |
| Pokémon | Quantity | Group | Friendship Gauge |
AP | Slates | |
|---|---|---|---|---|---|---|
|
|
Zubat | 5 (Patterns 1 & 3) | Poison | 494 | 2 | Zubat (80%) Golbat (20%) |
|
|
Golbat | 1 (Patterns 1 & 3) | Poison | 950 | 3 | Golbat (80%) Crobat (20%) |
|
|
Graveler | 3 (Patterns 1, 2, & 4) 6 (Pattern 3) |
Rock | 1,140 | 4 | Graveler (80%) Geodude (19%) Golem (1%) |
|
|
Quilava | 3 (Pattern 2) | Fire | 616 | 2 | Quilava (95%) Typhlosion (5%) |
|
|
Shuckle | 4 (Patterns 2 & 4) | Rock | 3,360 | 3 | Shuckle (100%) |
|
|
Teddiursa | 5 (Patterns 2 & 4) | Normal | 364 | 1 | Teddiursa (80%) Ursaring (20%) |
|
|
Ursaring | 5 (Patterns 1 & 2) 1 (Patterns 3 & 4) |
Normal | 1,596 | 4 | Ursaring (80%) Teddiursa (20%) |
|
|
Mightyena | 1 | Dark | 2,850 | 6 | Mightyena (80%) Poochyena (20%) |
|
|
Hariyama | 1 (Pattern 2) 4 (Pattern 3) 5 (Pattern 4) |
Fighting | 1,890 | 4 | Makuhita (80%) Hariyama (20%) |
|
|
Shieldon | 4 (Patterns 1 & 3) | Steel | 1,330 | 2 | Shieldon (80%) Bastiodon (20%) |
|
|
Croagunk | 3 (Patterns 1 & 4) | Poison | 494 | 2 | Croagunk (80%) Toxicroak (20%) |
| Pokémon | Group | Friendship Gauge |
Agitated Gauge |
AP | |
|---|---|---|---|---|---|
 |
Tyranitar | Rock | 7,125 | 1,215 | 11 |
Text of this section & map image are taken from WarriorGallade's post on the subject, supplemented with information from the official Prima guide book, and condensed/reorganized slightly. Used with permission.
This Mission contains four different patterns of wild Pokémon that can appear. Click a thumbnail below to view that pattern's map.
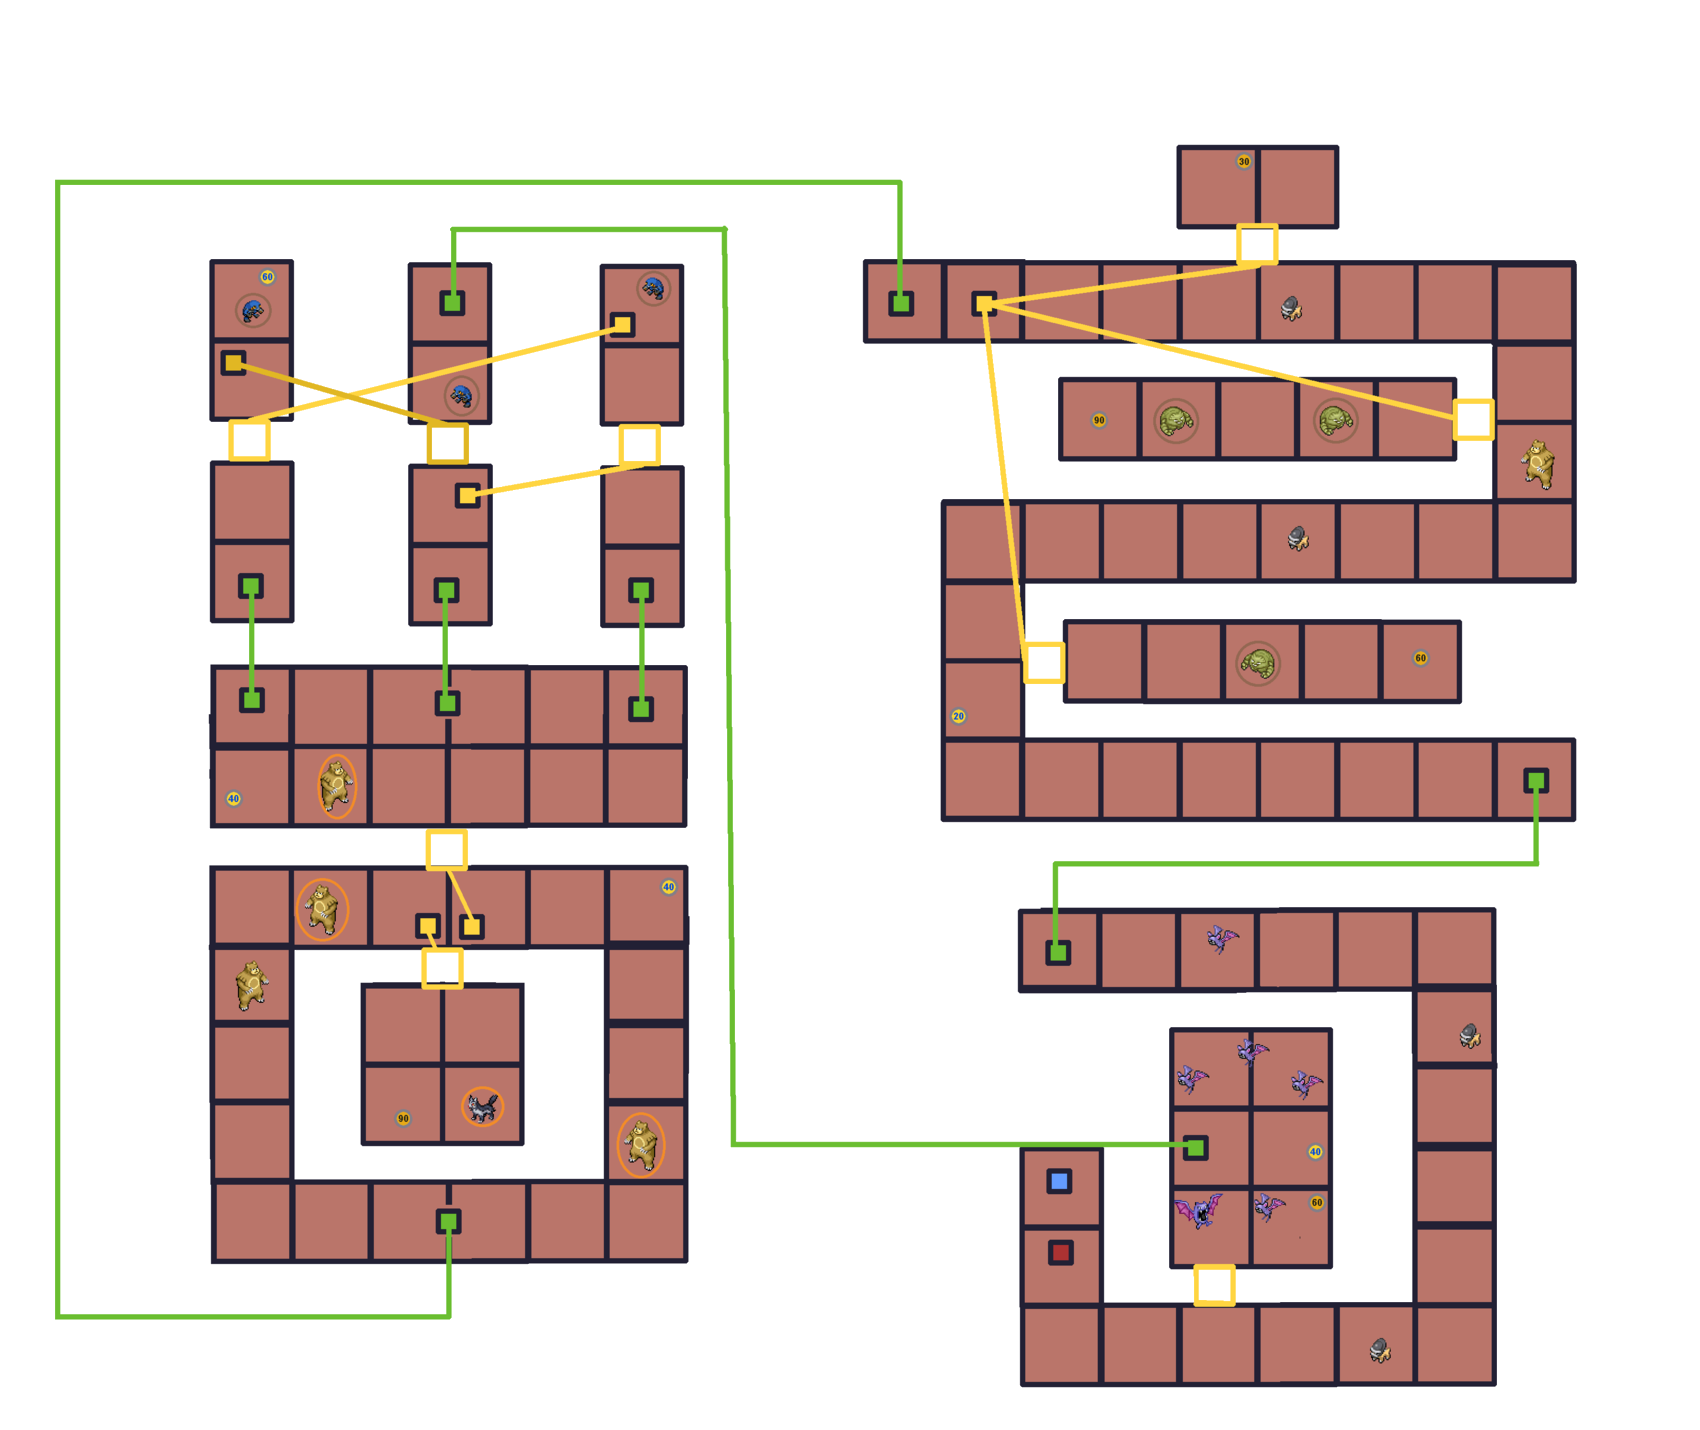
Legend:
 Icons like this (darker) give the player extra seconds, determined by the number.
 Icons like this (lighter) restore the player's Styler by the specified number of energy.
The ability to get an S-rank on this Mission depends on its layout. If Shuckle appears in the first room, consider resetting, since Shuckle's huge HP wastes valuable time compared to Shieldon's. Even though the goal of the Mission is to capture 8 Pokémon, the isolated teleporter room with 6 easy captures is a time sink and should be ignored.
The route you should take instead is this: from the first room's teleporter, navigate the long hallway with Graveler throwing rocks at you to a tile switch and teleporter. Activate the switch, pass by the Hariyama/Ursaring, and reach the room with two switches. Activate both, then either avoid or capture Mightyena (they yield a nice 6 AP, but are tough to capture) and grab the 90-second time powerup. Turn around, capturing pretty much every Pokémon you run into from here. There should be 3 in the first chamber (2 Shieldon and 1 Zubat/Teddiursa) and 5 in the second (3 Graveler, 1 Shieldon, and 1 Hariyama/Ursaring): one of these can be skipped if Mightyena has been captured, but it is preferable to not engage Mightyena. Continuing north past the 90-second time power up wastes a lot of time with the amount of teleporters and spread-out nature of this section.
Pattern IdentificationIn this Mission, the locations of powerups and species of Pokémon are different depending on the pattern. Given that this Mission simply requires capturing Pokémon, aiming for a pattern whose Pokémon are easy to capture for your playstyle or Poké Assist can help with getting through the Mission quickly.
Unlike other boss Pokémon, Tyranitar does not clear its Friendship Gauge gradually when it is not looped, but instead recovers in chunks (about 4% every 4-5 seconds). Try to prevent this by finding time for loops where possible or using Assists.
For a Shieldon layout (recommended), expect a B-rank on your first try. Save the S-rank attempt for after you have had some time to level up your Partner. Using the route outlined above can help save time on this Mission. AP farming starts to become less efficient here since clearing the mission yields more AP than individual captures.
Close-range Assists are strong against Tyranitar, as it is unusually slow, but long-range Assists are good at helping prevent it from clearing its Friendship Gauge when attacks prevent the player from being able to loop it. Preventing its clearing its gauge is more important than the raw damage of Assists. Piplup remains reliable for this reason and its slowing effect. Hariyama's Stop effect is also good for helping prevent attacks, and Hitmonlee's Assist also offers good damage and range.