Text of this section & map image are taken from WarriorGallade's post on the subject, supplemented with information from the official Prima guide book, and condensed/reorganized slightly. Used with permission.
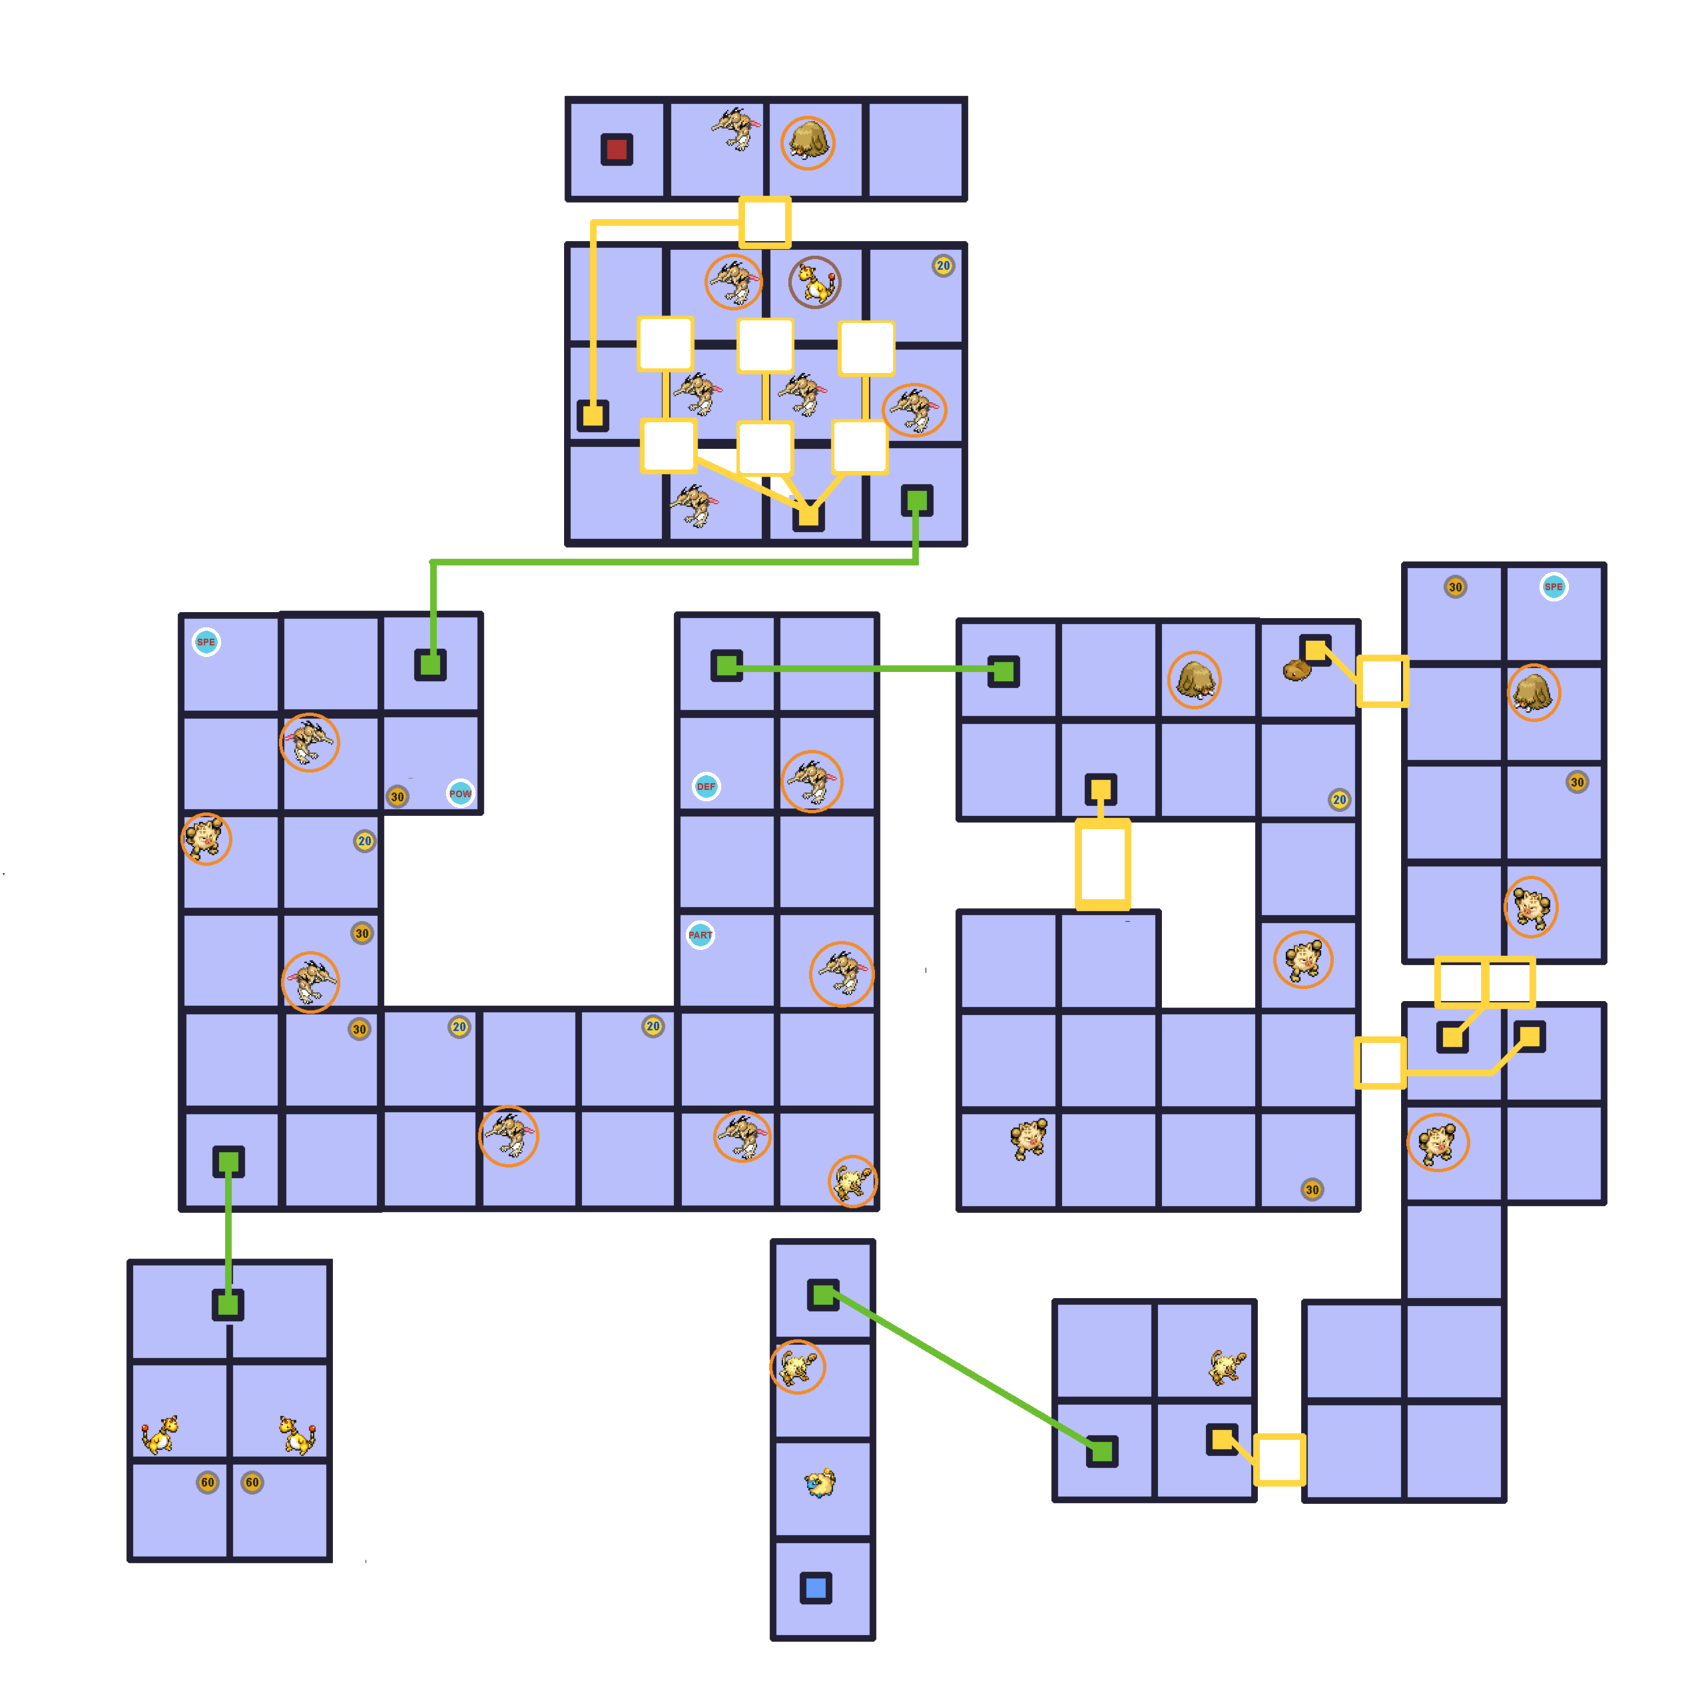
Map
This Mission contains five different patterns of wild Pokémon that can appear. Click a thumbnail below to view that pattern's map.
Legend:
Blue tile: The player's start point.
Red tile: Takes the player to the boss room, once the condition has been met.
Green tile: Teleports the player to another specific location on the map.
Yellow tile: Standing on this tile makes a bridge appear between separate platforms. Tiles that need multiple players are marked with red dots that indicate how many players are needed.
Orange circle (around a Pokémon): This Pokémon is angry and will chase the player on sight.
Brown circle (around a Pokémon): This Pokémon is angry and will launch projectiles toward the player on sight.
Icons like this (darker) give the player extra seconds, determined by the number.
Icons like this (lighter) restore the player's Styler by the specified number of energy.
Icons like this (POW) increase the player's Styler's power by 20%.
Icons like this (PART) increase the player's Partner Pokémon's Poké Assist power by 20%.
Icons like this (DEF) reduce the player's damage taken by 1 (to a minimum of 1).
Icons like this (SPE) increase the player's movement speed.
Level Strategy
This mission has the easiest requirement yet: capture one Mareep, the first Pokémon you meet. The route is nearly a straight path with no backtracking, but you’ll often stand still on switch tiles for a few seconds, and Pokémon may rush you into an inopportune capture.
In the second room: Step on both switches and head north. Dodge the Pokémon and clear chests. A 60-second time extension plus a speed powerup is all that's really important here. The location of the powerup is dependent on the pattern; make sure to identify it quickly to give yourself the most time possible. Purugly is easier to capture than Primeape, but Glameow and Mankey are similarly easy.
In the room with the curved hallway: This room is packed with powerups and Styler recharges, but guarded by Dodrio/Pelipper that catch up to you fast, especially without the speed powerup. Grab the Defense and Partner powerups near the entrance, skip the Styler recharges unless needed, and sneak past the Dodrio/Pelipper. S-rank is still possible early without the speed powerup.
The bottom-left teleporter in the room with the curved hallway leads to a room with 2 minutes of time extensions, vital for an early S-rank. On Pattern 4, you can get Glaceon (13 AP, high HP, harmless attacks) and Delibird (30 AP). On all other patterns, you get two Ampharos which move toward you. Skip the room if you expect the captures to cost more than 2 minutes. Slow Ampharo captures can still clear the mission, but even an A-rank becomes hard.
Head north from the teleporter. If you failed to pick up the speed powerup, hug the left edge to find another in the top-left corner. If you already have one, hug the right edge for time/Styler extensions. Grab the attack powerup below the green teleporter at the end of the path.
In the final room: Activate only the left-side switch to open the platforms at the top. Skip the other one, since the floor gaps help you evade chasers and activating it makes that harder. These Ampharos shoot projectiles from afar, unlike the earlier ones. Avoid the Piloswine near the boss door if it is present.
Pattern Identification
Some Pokémon are only found in certain patterns, so grinding for their Slates is dependent on getting the correct pattern. The placement of some powerups and switches is also dependent on the pattern.
In the second room, the player first sees Mankey: Pattern 1, 4, or 5.
In the second room, the player first sees Glameow: Pattern 2 or 3.
On a Mankey pattern, in the second room, the Pokémon at the top of the northeastern platform is a Piloswine: Pattern 1.
On a Mankey pattern, in the second room, the Pokémon at the top of the northeastern platform is a Kabuto: Pattern 4.
On a Mankey pattern, in the second room, the Pokémon at the top of the northeastern platform is an Ambipom: Pattern 5.
On a Glameow pattern, in the second room, the Pokémon at the top of the northeastern platform is an Ambipom: Pattern 2.
On a Glameow pattern, in the second room, the Pokémon at the top of the northeastern platform is a Piloswine: Pattern 3.
Minibosses
Primeape, like a boss Pokémon, get agitated at 50% HP. Otherwise, it is barely boss-like, since it leaves itself open to loops. Its attacks have decent range that can break loops, but after ! or !!! it has a cooldown of a couple of seconds where it can’t move. Use that window for assists or chained loops. Don’t rush the assist: a <15 second blitz is possible but risky, since a scared-off partner makes breaking agitation very hard at low levels. They have the following three attacks:
Punch (!): Punches the area in front of itself. A quick, short-range attack with cooldown.
Charge (!!): Rushes ~1/3 of the screen, damaging your Styler upon contact. This attack does not incur cooldown.
Charge (!!!): The same as the other charge attack, but with cooldown.
You’ll likely get Primeape's/Mankey's slates here. Their stats look great but avoid using them unless you love the Pokémon: despite a 0.5s (Mankey) or 1s (Primeape) recharge, they spend another 3-4 seconds idle after the punch barrage, making them likely to be hit and sending them away for 19-20 seconds.
Ampharos doesn’t agitate, but has high HP for this point in the game, so a pausing assist helps. Its attacks are what make it effectively miniboss-tier and are great at wasting your time. It’s very hard to collect both powerups without at least one (time-wasting) capture. Reckless play (especially against two) can drain Styler energy as well. Ampharos can use the following attacks:
Sparks (!): Generates a lot of sparks immediately around it. It is difficult to loop around.
Thunderbolt (!!): Charges for 1 second, then lightning strikes random spots for ~2.5 seconds. It is possible to loop around, but requires good luck.
Electric orb (!!!): Ampharos summons an electric orb that circles around it at a short range, moving with Ampharos, and lingering for several seconds (allowing it to regenerate health uninterrupted). It is difficult to loop around.
Boss
Ice pillar (!): Raises 8 ice pillars in a short radius around it. 10 damage per hit. Impossible to loop around.
Snow scatter (!!): Launches icy wind in the direction it's facing. 12 damage per hit. Impossible to loop around.
Ice pillar (!!!): Raises 4, 6, or 8 pillars around the arena's edges or in a circle around Abomasnow. 8 damage per hit. Possible to loop around. When the pillars are around Abomasnow, it is possible to loop around Abomasnow inside them, but very difficult.
Shock wave: This is not telegraphed. Abomasnow makes hops around the screen, doing a shock wave where it lands. 8 damage per hit. Risky to loop around, and often the ice pillars make it impossible.
S-Rank Tips
Probably the easiest Ice Temple mission for its level. Expect a B/C rank on the first attempt, with A possible early. If too many Dodrio/Pelipper catch you, you risk not clearing the mission at all. Get the speed powerup early, and avoid unlucky Ampharos captures when possible. To get an S-rank, you'll want to avoid Dodrio/Pelipper, bring a Pokémon with a Fire-type Assist, and take advantage of all powerups being available.
Partner Choice
Typhlosion (or Cyndaquil/Quilava) is startlingly powerful here: drop it on Abomasnow as its (!) attack winds down, as its (!!) attack starts, or when its (!!!) attack is telegraphed. This short-range tactic also pays off against a later boss, so starting to put AP into Typhlosion's stats is recommended for that purpose. Still, for a first clear, Piplup is still reliable: its long range lowers the risk of being hit, lets you learn about Abomasnow's attack patterns by observing, and lets you chip away safely.
Slate Spotlights
Both the Slates dropped by S-ranking this mission (Froslass and Abomasnow) provide Pokémon whose Assists are useful, so it may be worth your time to grind S-ranks on this mission.
Froslass (90%): WarriorGallade considers this the #2 Assist in Past Missions (Piplup ranks at #4). Froslass' Assist is similar to Typhlosion's, but with about 50% more power and a very potent slowing effect in exchange for worse accuracy. Essentially "Piplup deluxe" if you accept the reduced range/accuracy. It takes practice to position correctly but shreds HP bars. At max level, the slowdown inflicted lasts ~18 seconds. If Froslass lands its assist and then gets hit and chased off, it returns in ~19-20 seconds, so when the slow wears off, that’s your cue that Froslass is ready to bring back, with no need to check the assist menu. Unlike another slowing assist covered later, it can easily brush past a foe to inflict status, even from some distance.
Abomasnow (10%): It raises ice pillars that damage foes on contact, which will hit speedy enemies multiple times as they cross several pillars. Max power is a staggering 500, and with Ice’s strong offensive coverage it whittles HP quickly, though it’s more difficult to use well. It also inflicts Tired, which is less useful going forward (since Feraligatr was the main Pokémon that Tired is good against), but handy against teleporting foes later.


 Icons like this (darker) give the player extra seconds, determined by the number.
 Icons like this (lighter) restore the player's Styler by the specified number of energy.
 Icons like this (POW) increase the player's Styler's power by 20%.
 Icons like this (PART) increase the player's Partner Pokémon's Poké Assist power by 20%.
 Icons like this (DEF) reduce the player's damage taken by 1 (to a minimum of 1).
 Icons like this (SPE) increase the player's movement speed.