Gauge


Electrode (20%)

Voltorb (20%)

7 (Pattern 2)
Xatu (5%)

Natu (20%)

Granbull (5%)

Granbull (30%)

3 (Patterns 3 & 4)
Manectric (20%)

3 (Pattern 4)
Claydol (20%)


Bronzor (20%)

Check out WarriorGallade's post on this Mission for more specific tips.
| Rank | AP | Slates |
|---|---|---|
| S | 320 | Grotle (90%) Lucario (10%) |
| A | 220 | Riolu (100%) |
| B | 160 | N/A |
| C | 120 | N/A |
| Pokémon | Quantity | Group | Friendship Gauge |
AP | Slates | |
|---|---|---|---|---|---|---|
|
|
Delibird | 1 (Pattern 2) | Ice | 4,180 | 60 | Delibird (100%) |
|
|
Jolteon | 1 (Pattern 3) | Electric | 6,090 | 11 | Jolteon (100%) |
|
|
Voltorb | 3 (Patterns 3 & 4) | Electric | 1,980 | 6 | Voltorb (80%) Electrode (20%) |
|
|
Electrode | 4 | Electric | 2,772 | 8 | Electrode (80%) Voltorb (20%) |
|
|
Natu | 8 (Patterns 1, 3 & 4) 7 (Pattern 2) |
Psychic | 1,804 | 5 | Natu (95%) Xatu (5%) |
|
|
Xatu | 2 | Psychic | 2,860 | 9 | Xatu (80%) Natu (20%) |
|
|
Snubbull | 3 (Patterns 1 & 2) | Normal | 1,804 | 5 | Snubbull (95%) Granbull (5%) |
|
|
Granbull | 2 (Patterns 1 & 2) | Normal | 5,280 | 11 | Snubbull (70%) Granbull (30%) |
|
|
Electrike | 11 (Patterns 1 & 2) 3 (Patterns 3 & 4) |
Electric | 1,804 | 5 | Electrike (80%) Manectric (20%) |
|
|
Baltoy | 7 (Pattern 3) 3 (Pattern 4) |
Psychic | 1,804 | 5 | Baltoy (80%) Claydol (20%) |
|
|
Pachirisu | 5 (Pattern 4) | Electric | 1,804 | 5 | Pachirisu (100%) |
|
|
Bronzong | 2 (Patterns 3 & 4) | Steel | 5,940 | 12 | Bronzong (80%) Bronzor (20%) |
|
|
Riolu | 2 | Fighting | 4,620 | 11 | N/A |
| Pokémon | Group | Friendship Gauge |
Agitated Gauge |
AP | |
|---|---|---|---|---|---|
 |
Lucario | Fighting | 12,600 | 1,500 | 22 |
Text of this section & map image are taken from WarriorGallade's post on the subject, supplemented with information from the official Prima guide book, and condensed/reorganized slightly. Used with permission.
This Mission contains four different patterns of wild Pokémon that can appear. Click a thumbnail below to view that pattern's map.
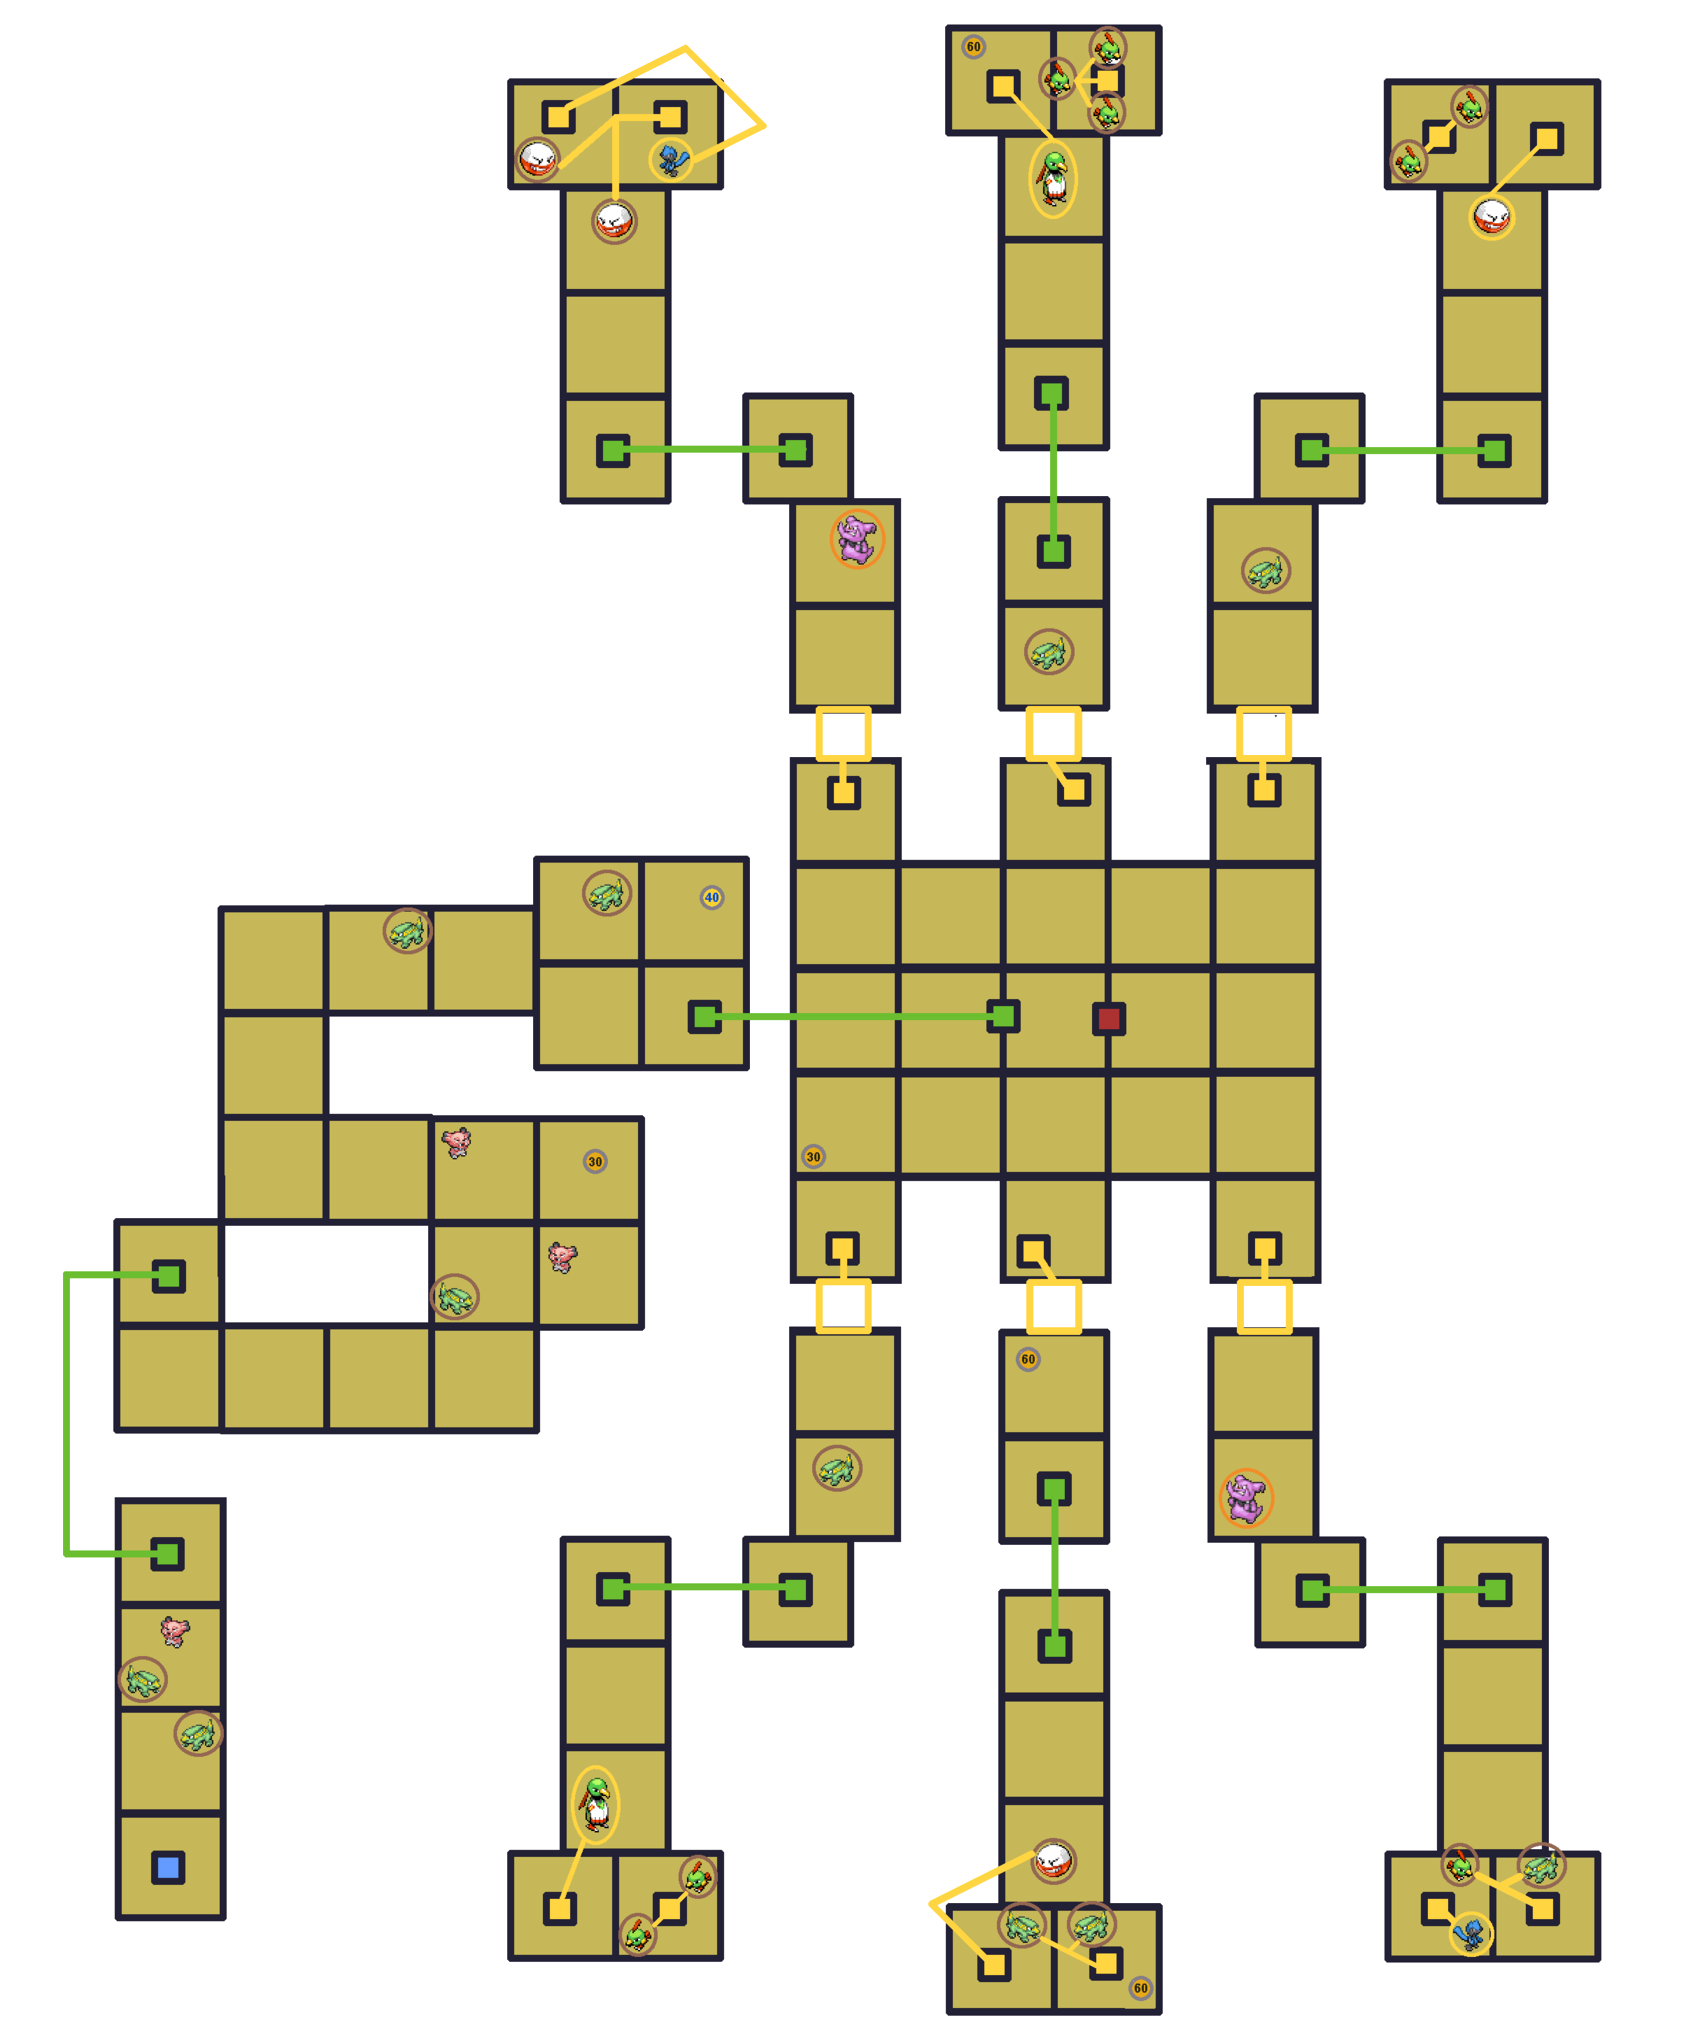
Legend:
 Icons like this (darker) give the player extra seconds, determined by the number.
 Icons like this (lighter) restore the player's Styler by the specified number of energy.
This mission has a smaller labyrinth than recent missions but still a large map, with some randomization returning. Capture two Riolu hidden under switches (11 AP each, surprisingly tough). Unlike Blaziken's mission, multiple Pokémon can hide under one switch, and they almost always chase or attack you. Styler energy matters here: taking too many hits makes the boss fight harder and risks a game over.
Regardless of the pattern, the chambers containing Riolu can be identified by the Pokémon past the tile but before the teleporter: Granbull and Bronzong. The two Riolu chambers will always be diagonally opposite to each other. Try to identify the pattern quickly and only activate switches whose hidden Pokémon you want.
In pattern 4, Delibird will be in the bottom-left chamber and give 60 AP; it may be worth the time to capture if you're in need of AP.
Pattern IdentificationThe location of Riolu is dependent on the pattern. One power-up is also in a slightly different location in Pattern 4.
Lucario is the first boss to get agitated twice: once at 50% gauge and again at 99%. It is very agile, making consistent looping difficult.
A struggle early on, but worth returning for an S-rank (WarriorGallade managed it with around 85 Styler power) since Lucario's Slate is valuable. Keep the map handy and repeat the mission to learn Pokémon patterns. Exploit Lucario’s Aura Spheres, which it often opens with, to chain loops, and you can return to looping almost instantly after its punch. Overwhelming it without letting up works best, unless it spams the rush attack or the punch volley.
Piplup is still the pick; any slowing effect helps. Don’t expect many Assists to land due to Lucario's high agility. Your only reliable opening is when it telegraphs Aura Spheres. A fully maxed Piplup is expensive but still cheaper than many other Pokémon, and keeps its reliable slow as its damage tapers off. Psychic-types, despite their type advantage, are usually too expensive and don't have enough power to be worth it, and Froslass' Assist, despite WarriorGallade's heavy praise for it, isn't well suited for Lucario's agility.
WarriorGallade ranks Lucario's Assist at #3 in the game. Unlike other Fighting-type Assists, Lucario's Assist involves launching a barrage of aura blasts in one direction, which do significant damage and inflict the Slow status. Fighting's strong typing and the sheer number of blasts at max level are what make this Assist worth the effort. One drawback: even at max level, the Slow status inflicted does not last long compared to Piplup and Froslass, and Lucario stays on the field a while after attacking, leaving it vulnerable to stray attacks from the enemy Pokémon.