Gauge
Gauge

Shinx (20%)

Luxio (15%)
Shinx (5%)

Hippowdon (20%)


Electrode (20%)

Xatu (5%)

Granbull (5%)


Claydol (20%)

Staraptor (2%)

2 (Pattern 4)
Rampardos (20%)

6 (Pattern 2)
Rampardos (20%)

Check out WarriorGallade's post on this Mission for more specific tips.
| Rank | AP | Slates |
|---|---|---|
| S | 320 | Pikachu (90%) Metagross (10%) |
| A | 220 | Noctowl (100%) |
| B | 160 | N/A |
| C | 120 | N/A |
| Pokémon | Quantity | Group | Friendship Gauge |
Agitated Gauge |
AP | Slates | |
|---|---|---|---|---|---|---|---|
|
|
Luxio | 5 (Patterns 3 & 4) | Electric | 3,476 | N/A | 9 | Luxio (80%) Shinx (20%) |
|
|
Luxray | 8 (Patterns 3 & 4) | Electric | 6,204 | N/A | 14 | Luxray (80%) Luxio (15%) Shinx (5%) |
|
|
Hippowdon | 4 (Pattern 3) | Ground | 8,316 | N/A | 14 | Hippopotas (80%) Hippowdon (20%) |
|
|
Pikachu | 5 | Electric | 1,540 | N/A | 5 | N/A |
|
|
Voltorb | 2 (Pattern 2) | Electric | 1,980 | N/A | 6 | Voltorb (80%) Electrode (20%) |
|
|
Natu | 7 (Pattern 2) | Psychic | 1,804 | N/A | 5 | Natu (95%) Xatu (5%) |
|
|
Snubbull | 2 (Pattern 3) | Normal | 1,804 | N/A | 5 | Snubbull (95%) Granbull (5%) |
|
|
Skarmory | 4 | Steel | 5,280 | N/A | 11 | Skarmory (100%) |
|
|
Baltoy | 7 (Patterns 1 & 4) | Psychic | 1,804 | N/A | 5 | Baltoy (80%) Claydol (20%) |
|
|
Staravia | 2 (Patterns 1 & 2) | Flying | 2,860 | N/A | 9 | Staravia (98%) Staraptor (2%) |
|
|
Cranidos | 5 (Pattern 1) 2 (Pattern 4) |
Rock | 3,300 | N/A | 10 | Cranidos (80%) Rampardos (20%) |
|
|
Rampardos | 7 (Pattern 1) 6 (Pattern 2) |
Rock | 6,600 | 792 | 14 | Cranidos (80%) Rampardos (20%) |
|
|
Pachirisu | 7 (Pattern 3) | Electric | 1,804 | N/A | 5 | Pachirisu (100%) |
| Pokémon | Group | Friendship Gauge |
Agitated Gauge |
AP | |
|---|---|---|---|---|---|
 |
Metagross | Steel | 20,460 | 2,762 | 22 |
Text of this section & map image are taken from WarriorGallade's post on the subject, supplemented with information from the official Prima guide book, and condensed/reorganized slightly. Used with permission.
This Mission contains four different patterns of wild Pokémon that can appear. Click a thumbnail below to view that pattern's map.
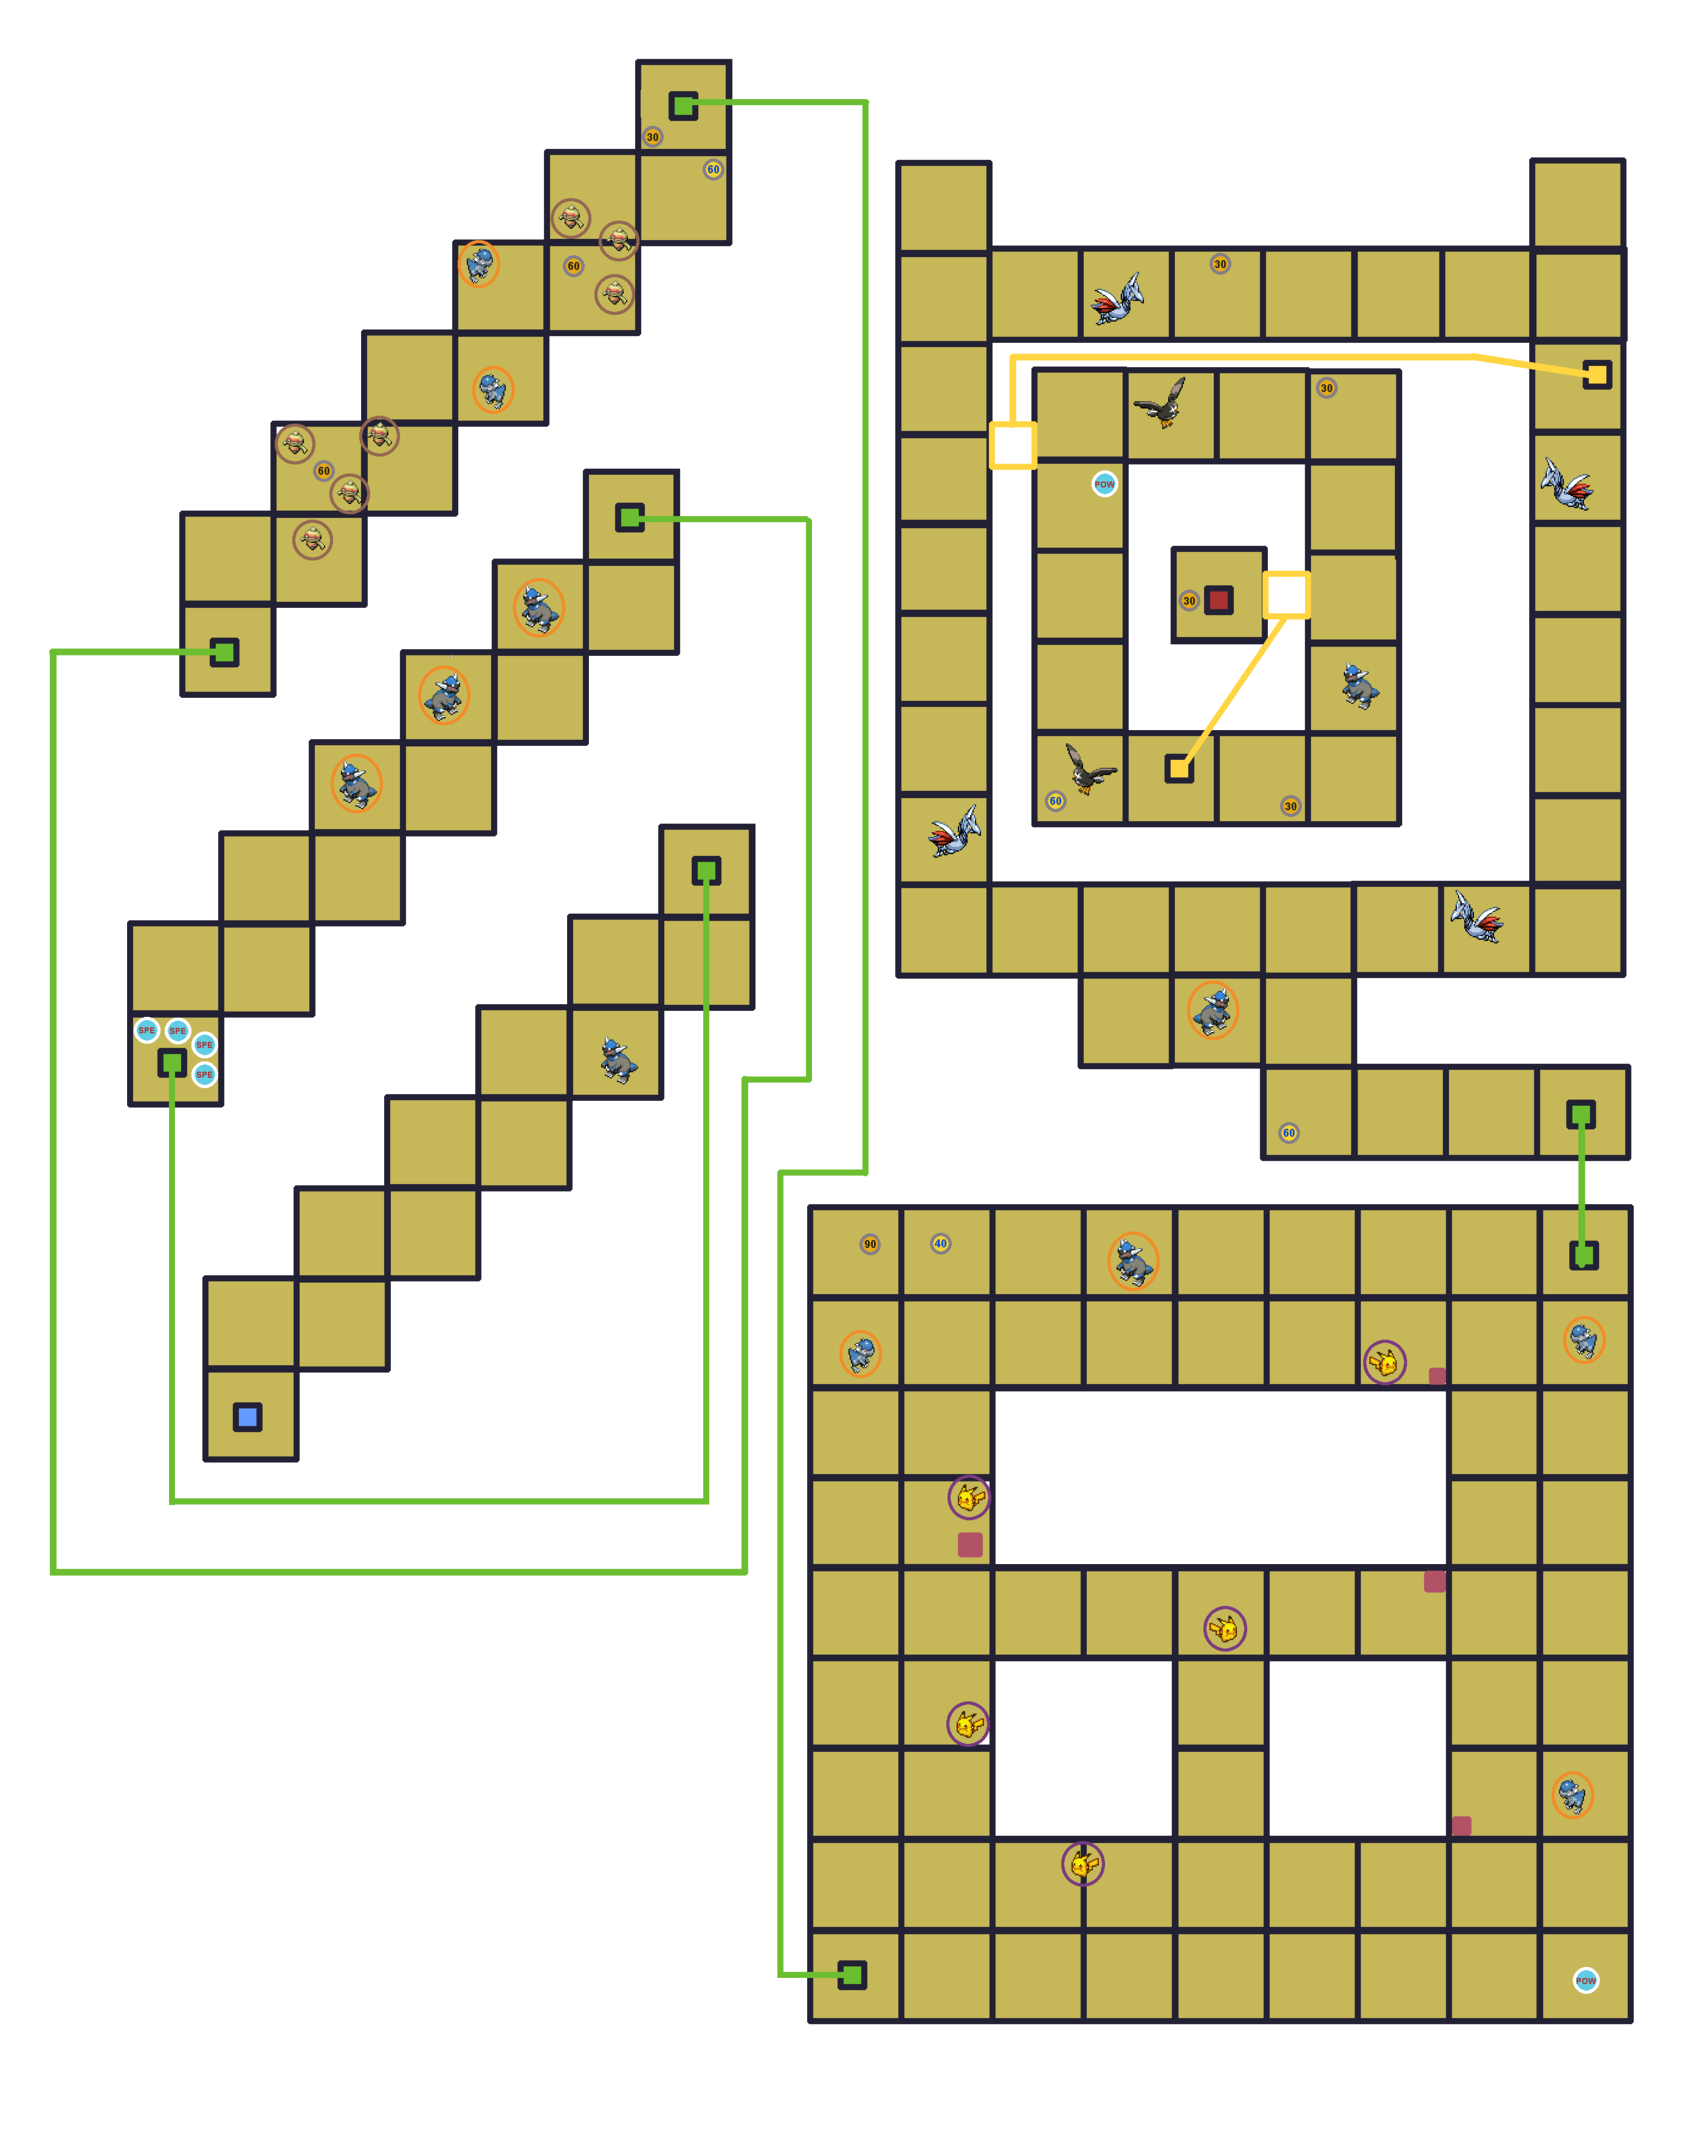
Legend:
 Icons like this (darker) give the player extra seconds, determined by the number.
 Icons like this (lighter) restore the player's Styler by the specified number of energy.
 Icons like this (POW) increase the player's Styler's power by 20%.
 Icons like this (SPE) increase the player's movement speed.
The maroon squares are WarriorGallade's suggestions for where to chase the Pikachu to effect easier captures.
Level StrategyThis mission seems more fair than the past few. Rampardos or Luxray will chase you relentlessly, and without the speed powerup found along the way, avoiding them is nearly impossible. Note on type matchups: resisted/immune Poké Assists deal 0.5x damage, but super effective Assists only deal 1.5x, so a disadvantaged Assist with strong utility can still be used effectively.
The location of the switches in the final chamber, as well as some powerups and Pikachu locations, is dependent on the pattern.
Rampardos, like a boss Pokémon, get agitated at 60% HP. Its attacks are similar to Bastiodon's, but it uses Rock Slide for its (!) attack and Headbutt for its (!!) and (!!!) attacks.
Luxray doesn’t agitate, but has annoying attacks similar to Ampharos'.
Skarmory doesn’t agitate, but is a time-waster with annoying attacks.
Variations for the (!) beam attack:
One of the easier S-ranks, especially once you have Pikachu chasing down. You’ll lose time on circling Pikachu and extra Rampardos/Luxray captures. Expect a high B/low A first try, with an S possible by attempt 2 or 3, as time is generous. The Rampardos variant seems slightly easier, especially with Piplup, thanks to Piplup's type advantage.
Piplup is great again: slowing Metagross lets you spam loops more easily, since it’s fast enough to make chaining difficult otherwise. Only hold off on deploying Piplup during the psychic sphere barrage. Otherwise, launch your assist right after a laser attack to see which type it is, and if it’s !!, place your assist a decent distance behind and let it work. This is also a fun mission to grind AP, with a good variety of slates.
Alternative partner options: Fire can work as a super-effective Assist, but you would rather use a long-range Assist such as Flareon over a short-range Assist such as Typhlosion. Lucario, despite its type advantage, may not be ideal here since it lingers a while after attacking. However, using it as Metagross uses a slow beam attack can do a lot of damage.
Staraptor can be obtained here as a rare drop (2%) from Staravia. WarriorGallade thinks this mission is better for grinding for this particular Slate than the next mission, even though Staraptor itself appears in that mission and its own Slate is a 20%, because the next mission is difficult to replay. Metagross' Slate can be obtained here, but WarriorGallade suggests that Metagross' Assist isn't really worth the time or effort.