Gauge

Togetic (5%)

Pikachu (20%)

Electrode (20%)

Xatu (5%)


2 (Patterns 2 & 4)
Manectric (20%)

Claydol (20%)

Baltoy (20%)


Staraptor (20%)

5 (Pattern 2)
10 (Pattern 4)

Bronzong (20%)

Bronzor (20%)
Check out WarriorGallade's post on this Mission for more specific tips.
| Rank | AP | Slates |
|---|---|---|
| S | 320 | Bellossom (90%) Magnezone (10%) |
| A | 220 | Starly (100%) |
| B | 160 | N/A |
| C | 120 | N/A |
| Pokémon | Quantity | Group | Friendship Gauge |
AP | Slates | |
|---|---|---|---|---|---|---|
|
|
Togepi | 1 (Pattern 4) | Normal | 1,364 | 4 | Togepi (95%) Togetic (5%) |
|
|
Raichu | 3 (Pattern 3) | Electric | 5,220 | 11 | Raichu (80%) Pikachu (20%) |
|
|
Voltorb | 4 (Patterns 2 & 4) | Electric | 1,980 | 6 | Voltorb (80%) Electrode (20%) |
|
|
Natu | 5 (Pattern 2) | Psychic | 1,804 | 5 | Natu (95%) Xatu (5%) |
|
|
Skarmory | 2 (Patterns 2 & 4) | Steel | 5,280 | 11 | Skarmory (100%) |
|
|
Manectric | 4 (Patterns 1 & 3) 2 (Patterns 2 & 4) |
Electric | 6,600 | 12 | Electrike (80%) Manectric (20%) |
|
|
Baltoy | 5 (Pattern 3) | Psychic | 1,804 | 5 | Baltoy (80%) Claydol (20%) |
|
|
Claydol | 5 (Patterns 1 & 2) | Psychic | 4,620 | 11 | Claydol (80%) Baltoy (20%) |
|
|
Starly | 4 | Flying | 1,804 | 5 | N/A |
|
|
Staraptor | 2 (Patterns 1 & 3) | Flying | 7,260 | 13 | Staravia (80%) Staraptor (20%) |
|
|
Pachirisu | 2 (Patterns 1 & 3) 5 (Pattern 2) 10 (Pattern 4) |
Electric | 1,804 | 5 | Pachirisu (100%) |
|
|
Bronzor | 8 (Pattern 1) | Steel | 1,980 | 6 | Bronzor (80%) Bronzong (20%) |
|
|
Bronzong | 5 (Patterns 3 & 4) | Steel | 5,940 | 12 | Bronzong (80%) Bronzor (20%) |
| Pokémon | Group | Friendship Gauge |
Agitated Gauge |
AP | |
|---|---|---|---|---|---|
 |
Magnezone | Electric | 18,720 | 2,527 | 22 |
Text of this section & map image are taken from WarriorGallade's post on the subject, supplemented with information from the official Prima guide book, and condensed/reorganized slightly. Used with permission.
This Mission contains four different patterns of wild Pokémon that can appear. Click a thumbnail below to view that pattern's map.
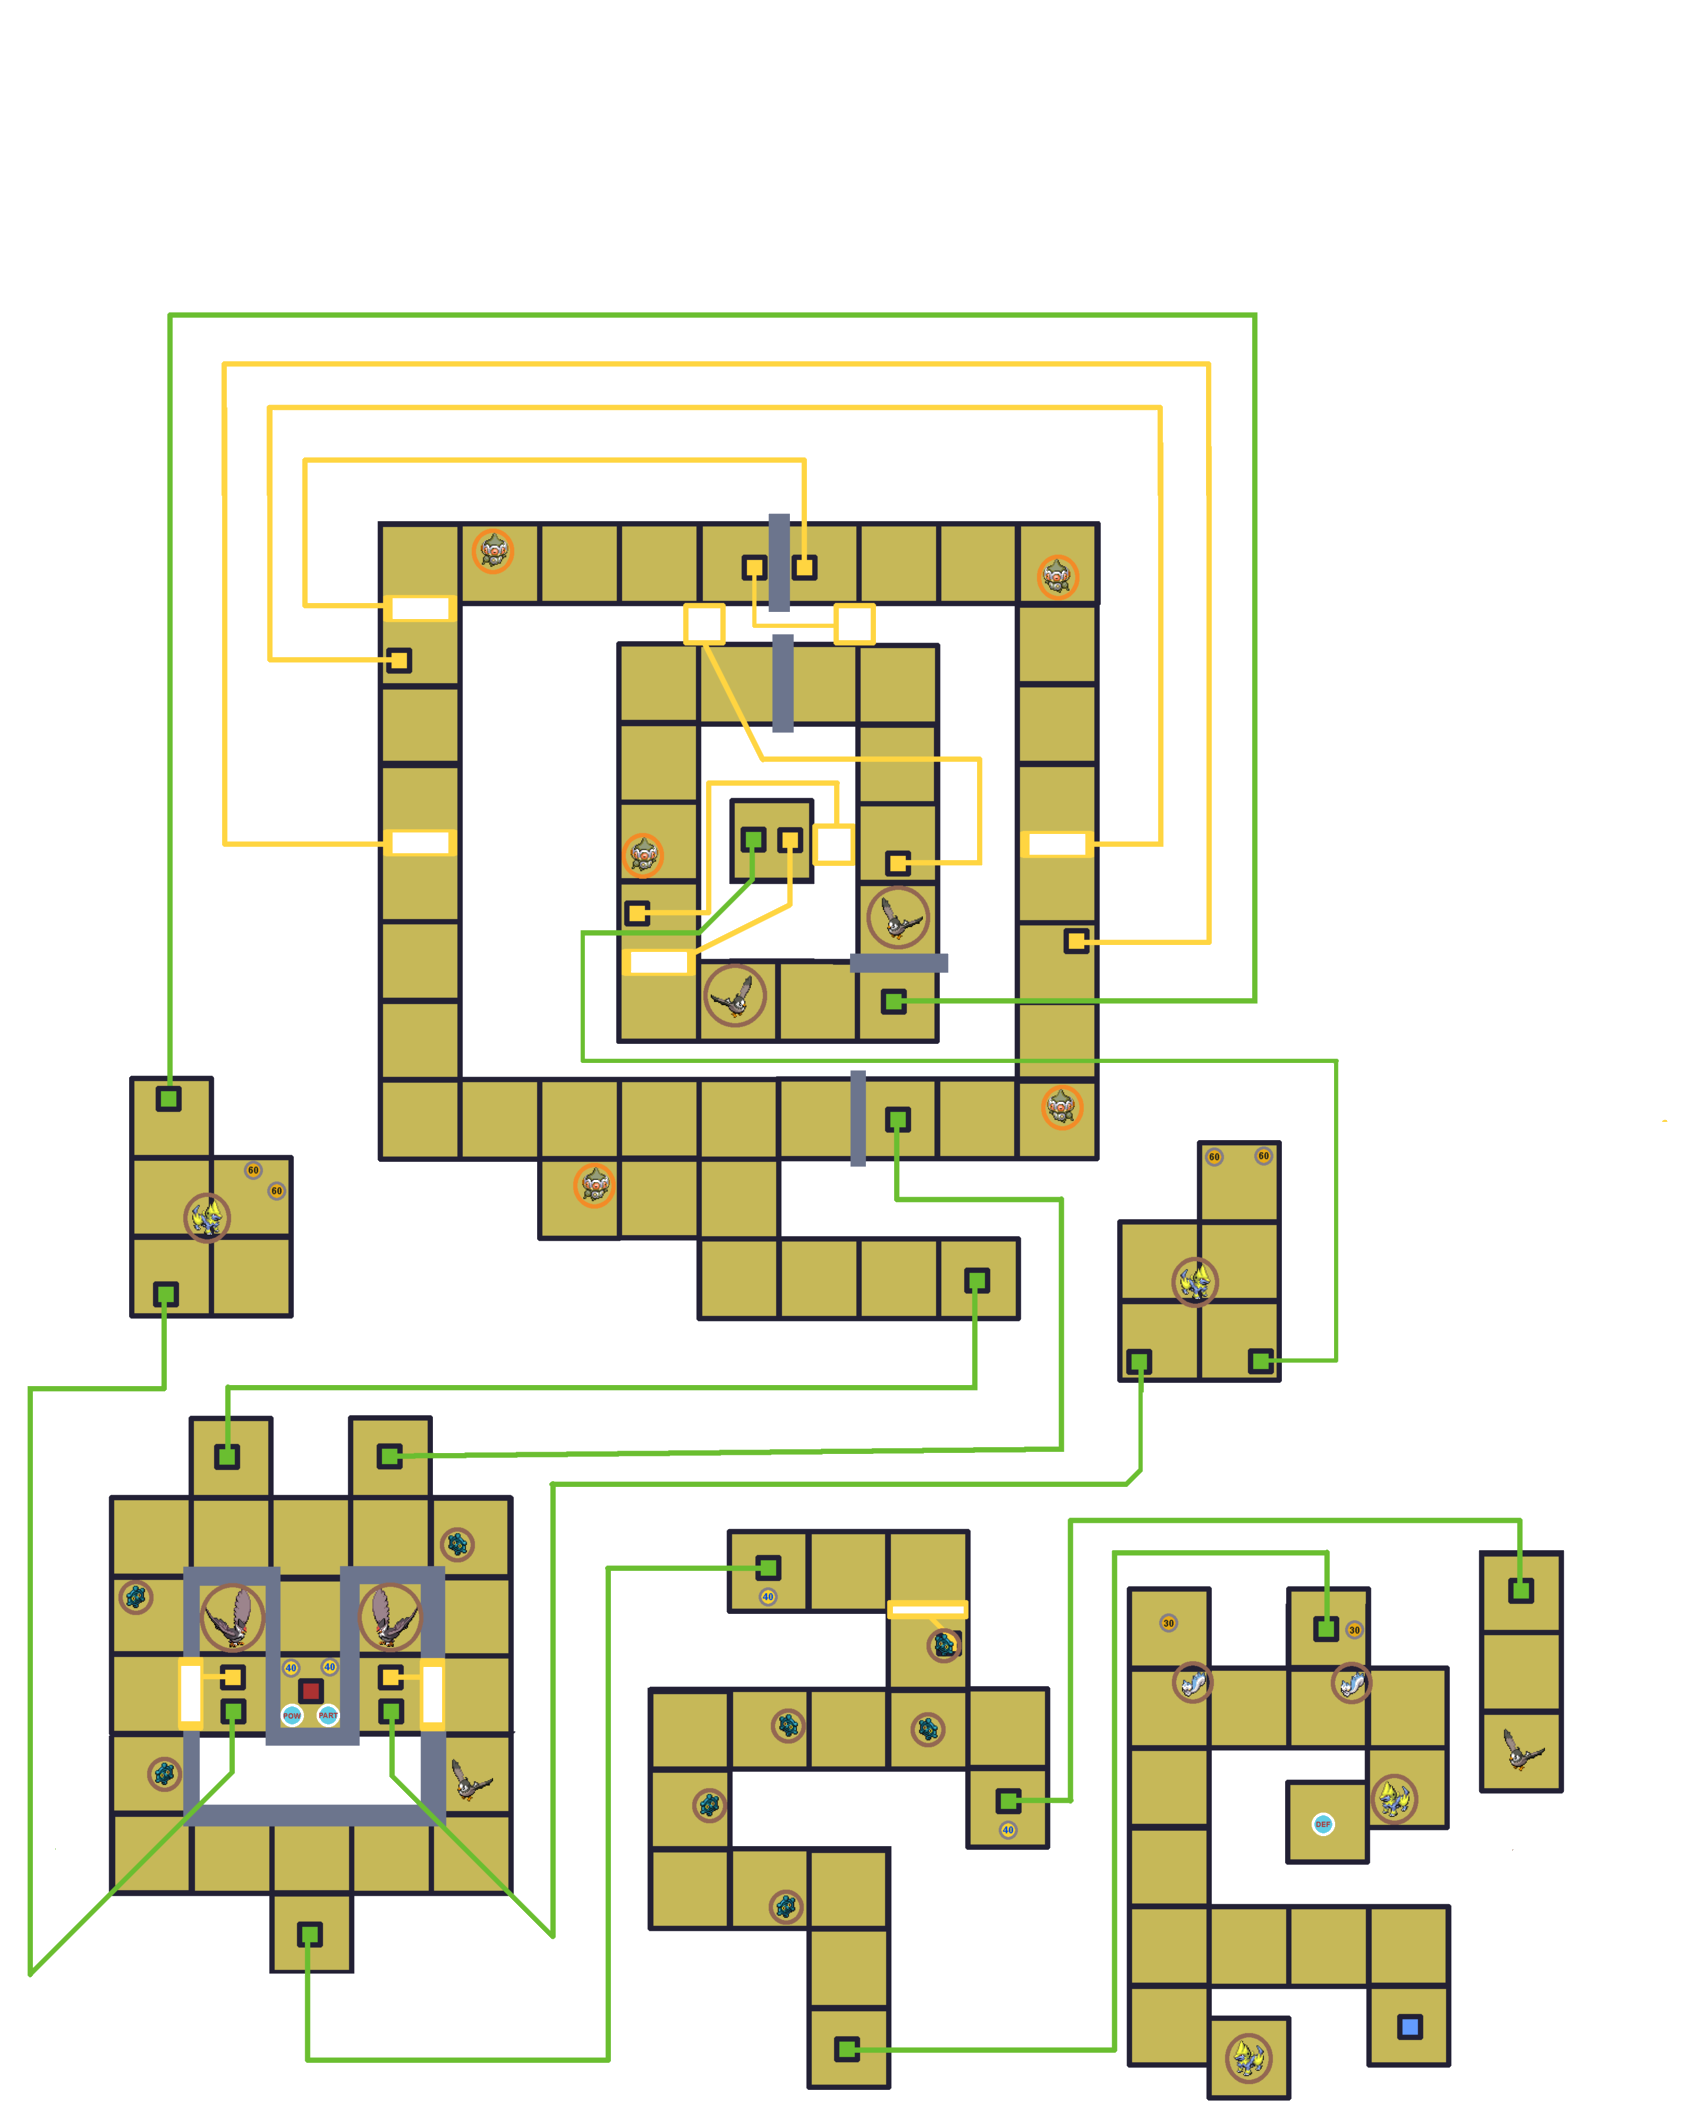
Legend:
 Icons like this (darker) give the player extra seconds, determined by the number.
 Icons like this (lighter) restore the player's Styler by the specified number of energy.
 Icons like this (POW) increase the player's Styler's power by 20%.
 Icons like this (PART) increase the player's Partner Pokémon's Poké Assist power by 20%.
 Icons like this (DEF) reduce the player's damage taken by 1 (to a minimum of 1).
This is another huge map, and clearly not designed for solo play. WarriorGallade needed to be Level 47 with 100 Styler power and a maxed Piplup to clear it, and even then, only with a C rank. WarriorGallade also reports that being level 99 didn’t make it easier. The problem here is simply that the required amount of distance traveled to open the boss room simply eats too much time, regardless of how many Pokémon the player avoids or how quickly they capture Magnezone.
The goal is to capture 4 Starly. The first two on the player's path, but the last two are scattered across a spiral maze that forces heavy backtracking. Time is extremely tight, and running out of time is an automatic game over.
The available Pokémon depend on the pattern. The difficulty of the mission is slightly dependent on the pattern, and some Pokémon only appear in certain patterns (for Slate grinding).
Both Claydol and Bronzong can teleport across the field, often right after an attack. Their HP is similar. Neither of them agitate.
Claydol is designed to waste your time. Psychic orbs break loop chains if you don’t lift your stylus. Its teleporting during the lingering orbs limits close-range assists to attack downtime or (!) windows.
The lesser evil. It sways for a second or two after telegraphing its attacks, giving extra loop time, and its attacks don’t persist, so exploitable blind spots make any Assist useful, despite its Steel typing. Close-range assists like Typhlosion melt it. Still eats 10+ seconds per capture, so capturing all 5 would cost about a minute.
It may not be possible to S-rank this while playing solo. At level 72, with no detours, and a lucky Magnezone (~35 seconds), WarriorGallade was about 40 seconds short. At level 99 with good routing and only 3 Bronzong captured, he was about 25 seconds short, which isn’t nearly close enough unless you can somehow avoid every Bronzong. Experimenting with Gliscor for type advantage didn’t help, since Magnezone can’t just be blitzed with Assists. If you are trying to collect all Slates, you may need to either accept missing this one or find a friend to play with. That said, if anyone does manage to pull off a lucky S-rank victory on this and get it recorded, let me know and I can feature the video and strategy here.
Piplup is likely still the best choice due to the investment you've put in it and the difficulty of finding AP to max other Pokémon at this time. If you're interested in grinding Slates, Lucario is also a good option due to its high damage, Slow effect, and type matchup with Bronzong, and its Slow effect is also helpful against Magnezone. Magnezone being Electric-type means its only weakness is Ground-type Assists, and Bronzong is weak to Ground-types as well; of the available Ground-types, Gliscor is likely better because of its pause effect, but it is very difficult to use effectively: try to time its hit on Magnezone for when the electrical orbs fade and then go nuts on loops.