Text of this section & map image are taken from WarriorGallade's post on the subject, supplemented with information from the official Prima guide book, and condensed/reorganized slightly. Used with permission.
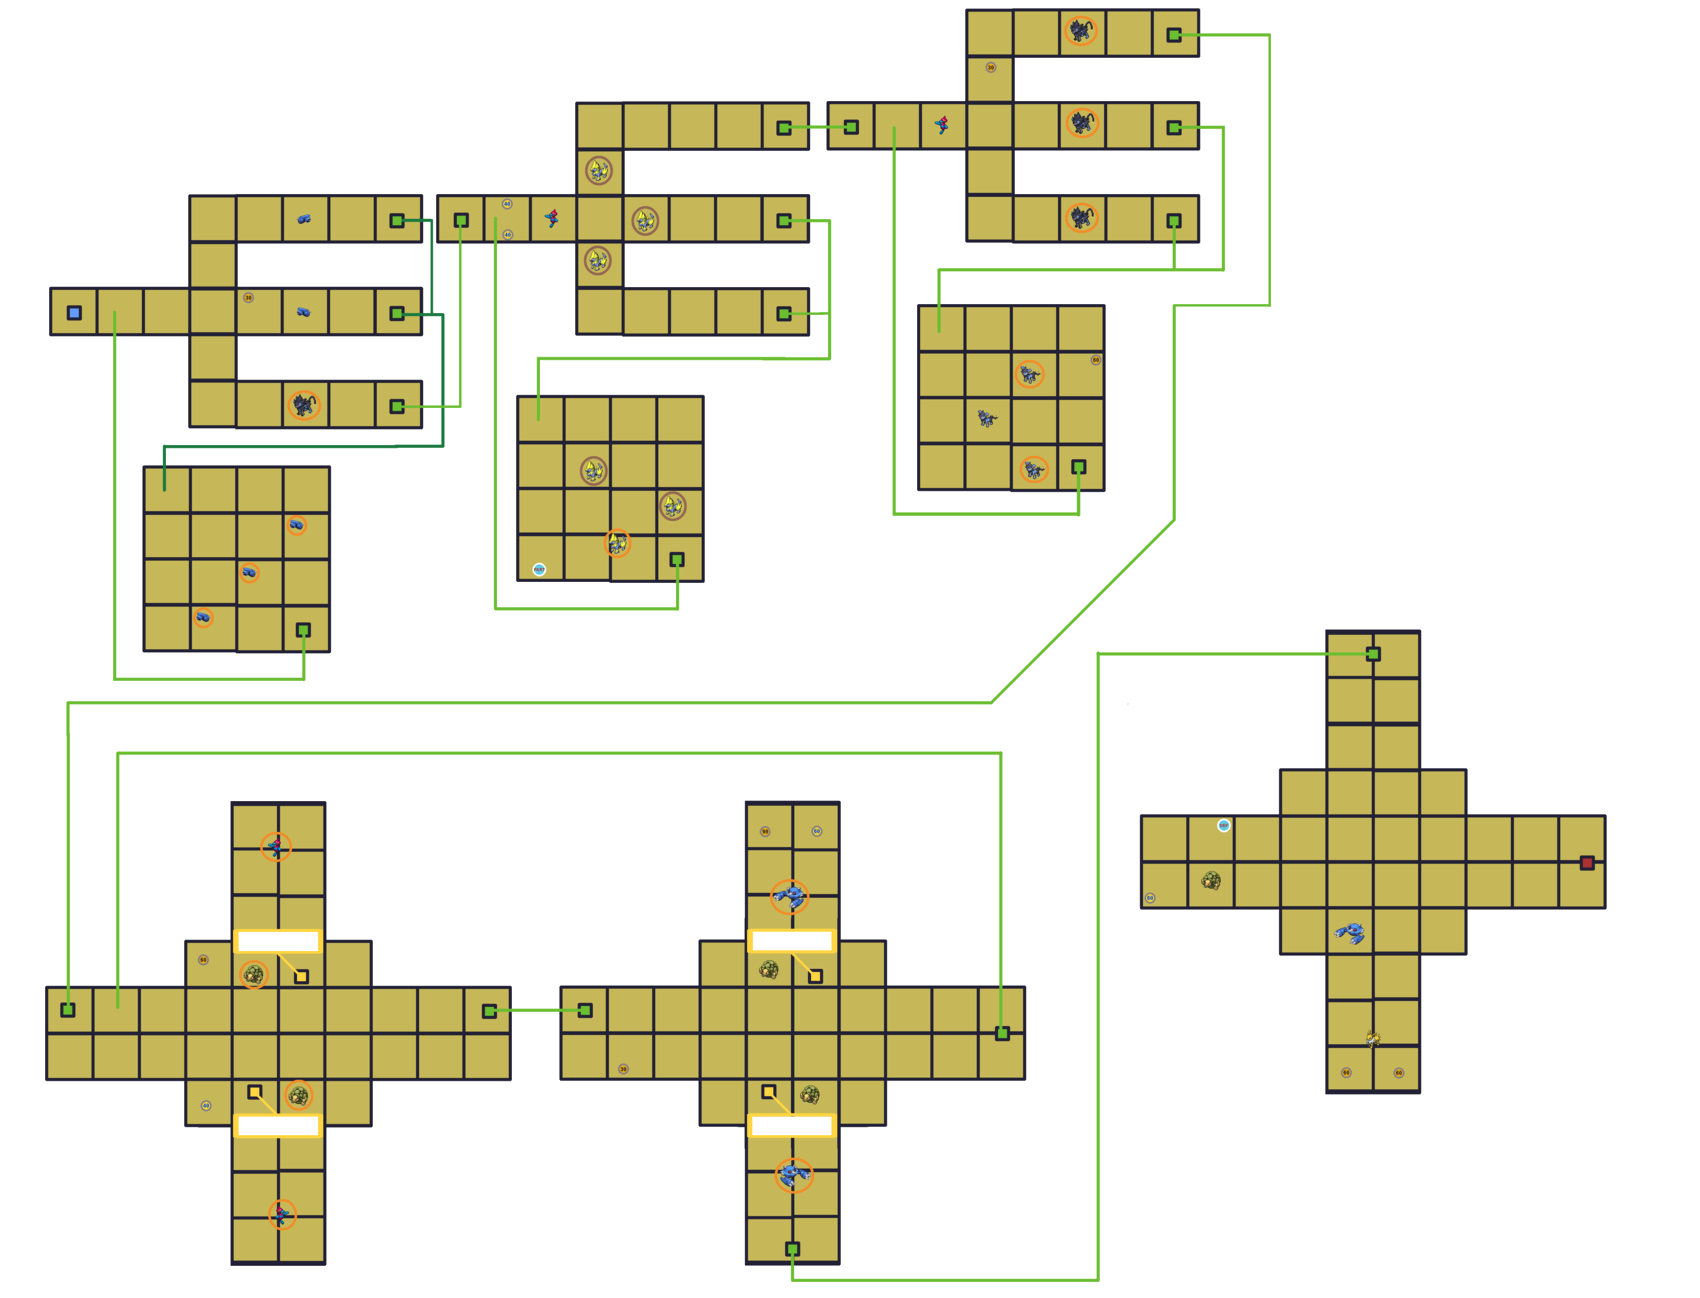
Map
This Mission contains four different patterns of wild Pokémon that can appear. Click a thumbnail below to view that pattern's map.
Legend:
Blue tile: The player's start point.
Red tile: Takes the player to the boss room, once the condition has been met.
Green tile: Teleports the player to another specific location on the map.
Yellow tile: Standing on this tile makes a bridge appear between separate platforms, or lowers a barrier on the walkway. Tiles that need multiple players are marked with red dots that indicate how many players are needed.
Orange circle (around a Pokémon): This Pokémon is angry and will chase the player on sight.
Brown circle (around a Pokémon): This Pokémon is angry and will launch projectiles toward the player on sight.
Icons like this (darker) give the player extra seconds, determined by the number.
Icons like this (lighter) restore the player's Styler by the specified number of energy.
Icons like this (PART) increase the player's Partner Pokémon's Poké Assist power by 20%.
Icons like this (DEF) reduce the player's damage taken by 1 (to a minimum of 1).
Level Strategy
This is a refreshing mission after Magnezone. Capture 4 Porygon-Z; these are not to the level of being minibosses, but not trivial either, and Piplup’s damage output starts to falter here. Porygon-Z can teleport short distances outside battle, but time is generous in this mission. Luxray is the bane of this mission, with the same attacks as Ampharos (field-wide discharges, rotating sphere), and is often difficult to avoid in narrow hallways.
This is an excellent stage for AP grinding, and you can easily get up to 1000 AP per clear if you are good at this map. Delibird in Pattern 2 also give significant AP. Identifying the pattern early is the best way to save time toward an S-rank.
Recommended pathing:
First room: Go straight to the right to see a chest with a 30-second powerup. You can determine whether you are on Pattern 1/3 or Pattern 2/4 based on the location of the chest: if it is near the top of the middle path, it is Pattern 1/3; if it is near the bottom, it is Pattern 2/4. Collect the powerup, then go on either the top or bottom path, depending on the pattern: on Pattern 1/3, take the bottom path past Luxray; on Pattern 2/4, take the top path past Luxray.
Second room: Capture Porygon-Z and continue to the right. If playing Pattern 1/3, take the top path. If playing Pattern 2/4, you can now determine if it is Pattern 2 or 4 based on the species of the Pokémon to the right of Porygon-Z. Manectric indicates Pattern 2, and you should take the top path. Raichu indicates Pattern 4, and you should take the bottom path. In all cases, if you take the wrong path, you will go to a room that has a Poké Assist powerup, so if you are in need of that extra protection or want to grind on Manectric, take the wrong path first.
Third room: Capture Porygon-Z and continue to the right. If playing Pattern 2/4, take the bottom path. If playing Pattern 1/3, you can now determine if it is Pattern 1 or 3 based on the species of the Pokémon to the right of Porygon-Z. Luxray indicates Pattern 1, and you should take the top path. Rampardos indicates Pattern 3, and you should take the bottom path. In all cases, if you take the wrong path, you will go to a room that has a 60-second time powerup, so if you are need of that, take the wrong path first.
Fourth room: From this point, the path is the same regardless of pattern. The difference is in the wild Pokémon, and the two chests at the beginning of this room swap their contents based on pattern. Step on both switches to open paths to the top and bottom to catch the final two Porygon-Z, then head to the next room.
Fifth room: If you want a 90-second powerup or an Energy powerup, step on the top switch to find two chests there. Otherwise, step on the bottom switch and take the teleporter there to continue to the final room. The teleporter on the right always leads back to the beginning of the fourth room.
Sixth room: The boss teleporter is always to the bottom-right of where you enter this room. For a Defense powerup and Styler energy, go left. For two 60-second time powerups, go down. Patterns 1 and 2 have Jolteon and Delibird, respectively, in the bottom part of this room: Jolteon can be a useful capture to grind its Slate, and Delibird, as always, gives significant AP.
Pattern Identification
The correct path and available Pokémon depend on the pattern.
The chest in the first room is near the top of the middle path: Pattern 1 or 3.
The chest in the first room is near the bottom of the middle path: Pattern 2 or 4.
On Pattern 2 or 4, the Pokémon to the right of Porygon-Z in the second room is Manectric: Pattern 2.
On Pattern 2 or 4, the Pokémon to the right of Porygon-Z in the second room is Raichu: Pattern 4.
On Pattern 1 or 3, the Pokémon to the right of Porygon-Z in the third room is Luxray: Pattern 1.
On Pattern 1 or 3, the Pokémon to the right of Porygon-Z in the third room is Rampardos: Pattern 3.
Minibosses
Porygon-Z is of course a mandatory capture, with high HP, so it can be slow to capture without a Fighting-type Assist or a slowing effect.
Discharge (!): Launches a small discharge of electricity around itself, which fades after a few seconds. Possible to loop around.
Magnetic orbs (!!): Launches 4 orbs that land on the field in an X shape around itself. They last for a few seconds. Possible to loop around.
Hyper Beam (!!!): Launches a single beam in the direction it's facing, which lasts for around 5-6 seconds. Impossible to loop around.
Porygon-Z can also use a psychic orb attack where it launches 4 streams of orbs that curve as they travel away from it, which lasts for several seconds, and is impossible to loop around. I am not sure which exclamation mark telegraphs this.
Golem has time-wasting attacks and high HP, but is easier to capture than Hippowdon.
Rock Slide (!) and (!!!): Similar to Bastiodon's and Rampardos' Rock Slide attacks.
Stone pillars: Raises pillars in a curved X-shape around itself, which fade quickly. Impossible to loop around.
Hippowdon also has time-wasting attacks and high HP.
Tremor (!): Creates a small tremor around itself. Possible to loop around.
Stone pillars: Identical to Golem's.
Mud Bomb: Launches a puddle of mud in the direction it's facing, which lingers for about 8 seconds. Possible to loop around.
Boss
Scatters electricity (!): Launches jolt projectiles in the direction it's facing. 10 damage per hit. Impossible to loop around.
Scatters electricity (!!): Launches three waves of jolt projectiles, in batches of three, in the direction it's facing. 10 damage per hit. Impossible to loop around.
Lightning strikes (!!!): Launches 4 huge thunderbolts that strike the field. 15 damage per hit. Impossible to loop around.
Electric barrier (!!!): Creates an electrical barrier around itself, that does damage when touched and moves as Electivire moves. It lingers for about 15 seconds, though Electivire usually recreates it as soon as it runs out. Only used after agitation. 8 damage per hit. Possible to loop around.
S-Rank Tips
This mission is pretty easy to clear with a long-range Assist, but an S-rank will require you to dodge as many captures as possible: though it is possible to capture everything you run across and still clear the mission, achieving an S-rank in the process probably requires a level of around 65 or higher. The advice is basically "take a strong Pokémon and rush for the end". Lucario helps greatly when it is at higher levels. An A rank is a fine early target, though ranks usually award more AP than captures do, so you will effectively be choosing between the possibility for Slates and AP.
Different Pokémon are easier to avoid than others. In general: Beldum and Metang can be avoided without much difficulty; Golem and Hippowdon are difficult to avoid (though it is possible with good luck); and most Electric-types will launch projectiles, making them easier to avoid (except Luxray, which can rush you and outspeed you).
Partner Choice
A slowing effect is very good against Electivire. Once its agitation phase is over and it is able to use the electrical barrier, close-range Assists become difficult to use effectively, so long-range Assists are more reliable overall. Piplup is still reliable for being long-range and having a slowing effect, but its damage output may be lacking. Lucario does a lot of damage and this is a good mission to practice using it. Froslass is less effective due to its close range.


 Icons like this (darker) give the player extra seconds, determined by the number.
 Icons like this (lighter) restore the player's Styler by the specified number of energy.
 Icons like this (PART) increase the player's Partner Pokémon's Poké Assist power by 20%.
 Icons like this (DEF) reduce the player's damage taken by 1 (to a minimum of 1).