Text of this section & map image are taken from WarriorGallade's post on the subject, supplemented with information from the official Prima guide book, and condensed/reorganized slightly. Used with permission.
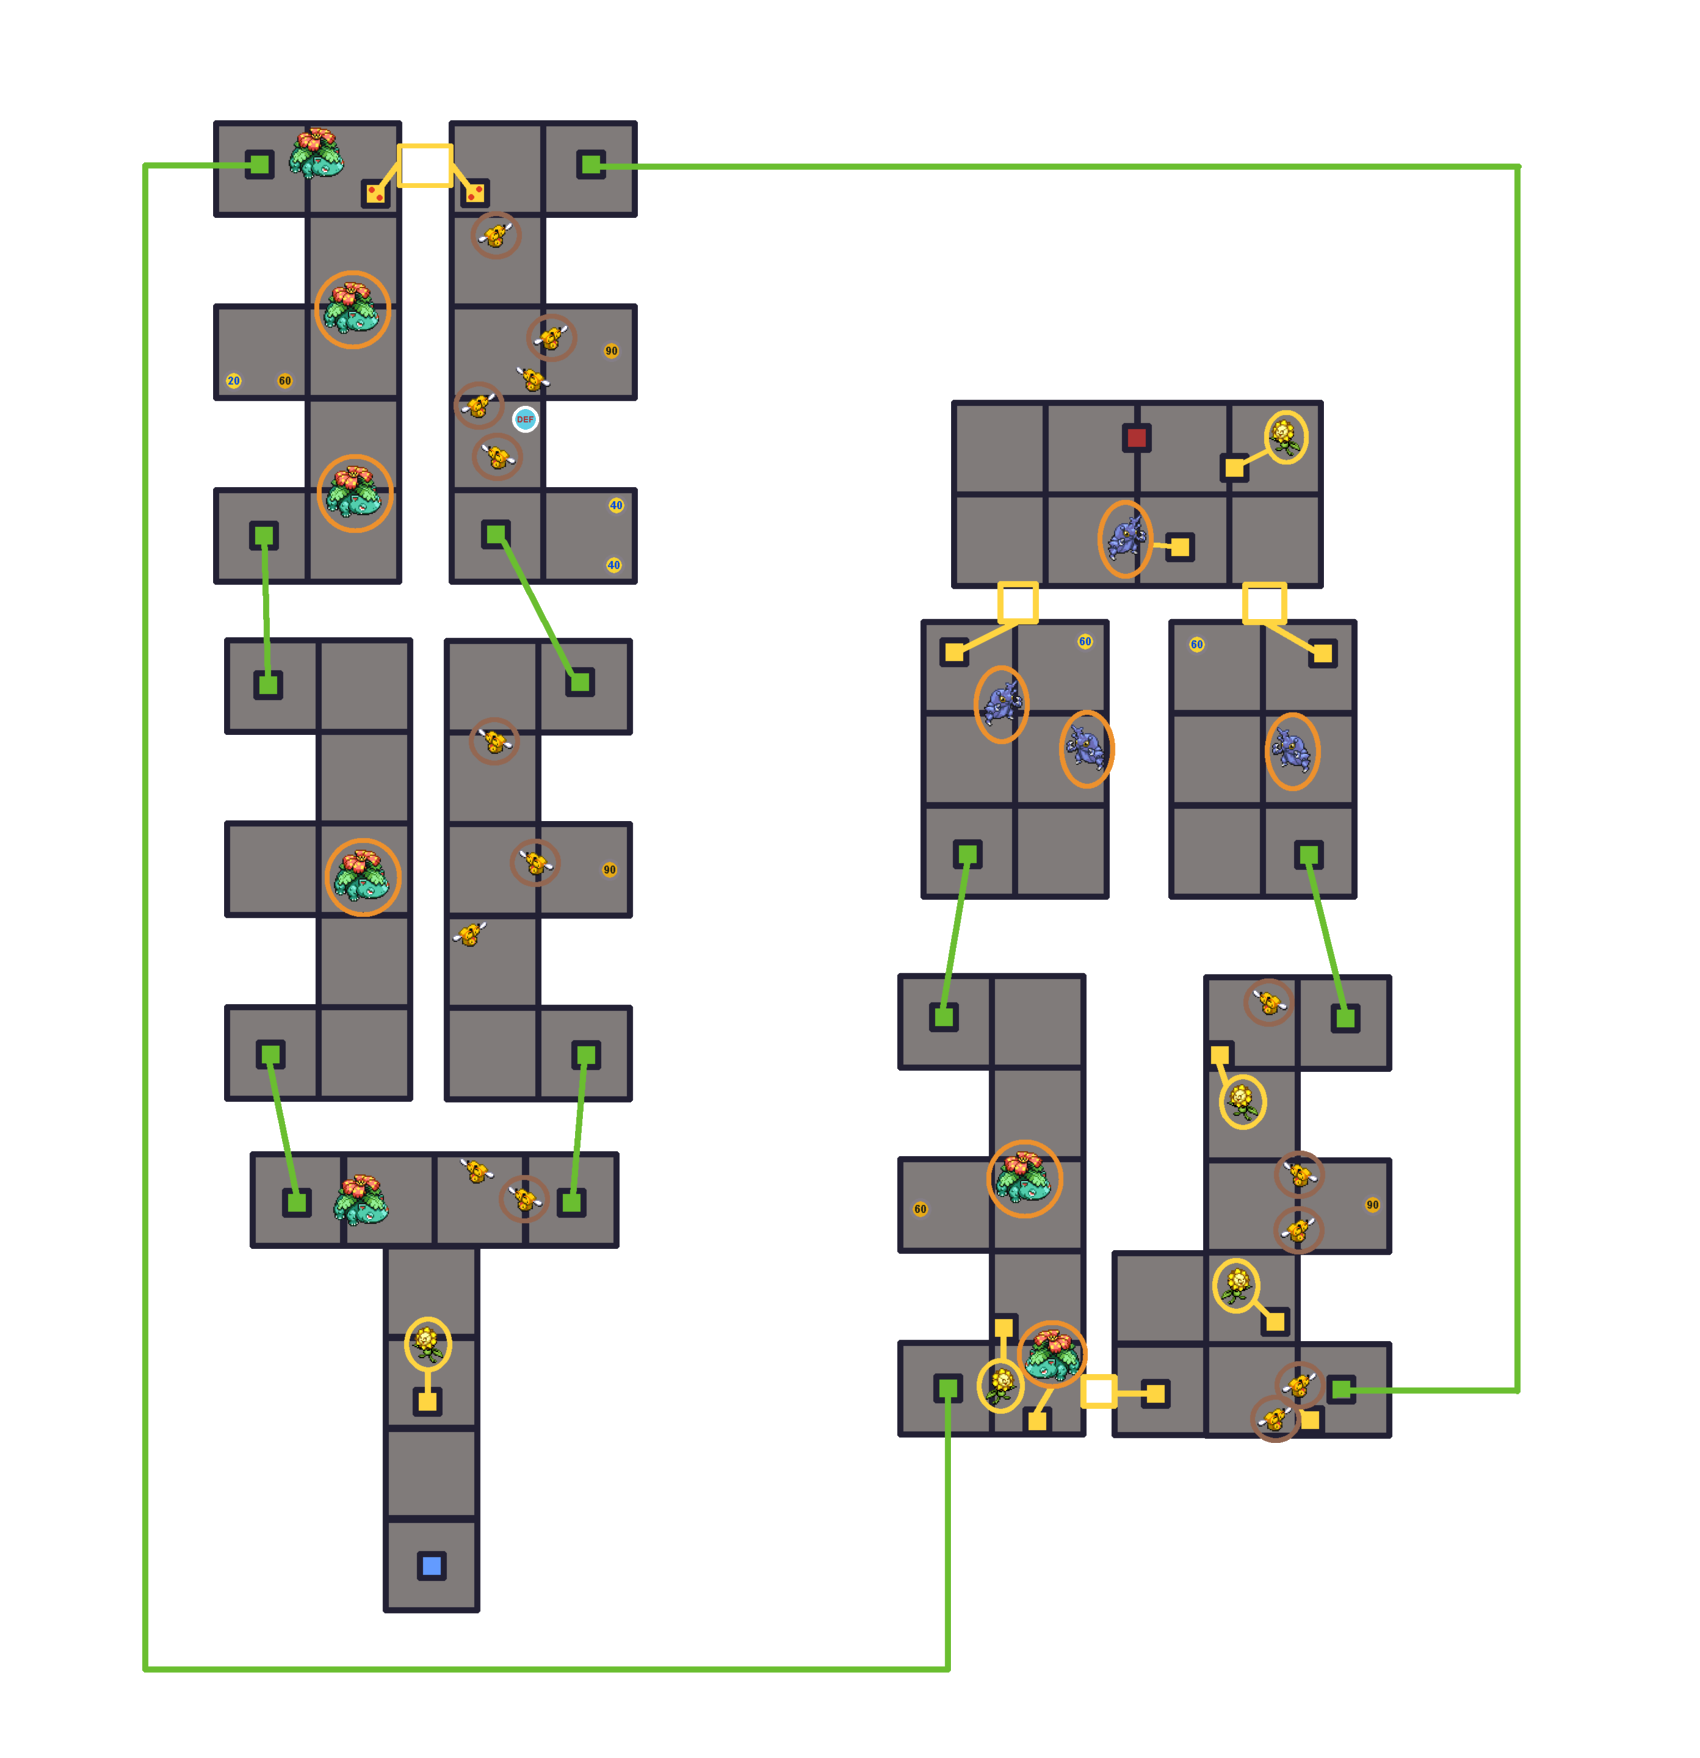
Map
This Mission contains four different patterns of wild Pokémon that can appear. Click a thumbnail below to view that pattern's map.
Legend:
Blue tile: The player's start point.
Red tile: Takes the player to the boss room, once the condition has been met.
Green tile: Teleports the player to another specific location on the map.
Yellow tile: Standing on this tile makes a bridge appear between separate platforms, or lowers a barrier on the walkway. Tiles that need multiple players are marked with red dots that indicate how many players are needed.
Orange circle (around a Pokémon): This Pokémon is angry and will chase the player on sight.
Brown circle (around a Pokémon): This Pokémon is angry and will launch projectiles toward the player on sight.
Icons like this (darker) give the player extra seconds, determined by the number.
Icons like this (lighter) restore the player's Styler by the specified number of energy.
Icons like this (DEF) reduce the player's damage taken by 1 (to a minimum of 1).
Level Strategy
Sunflora are easy captures, and this is the last big spike in HP pools: later missions only increase steadily. Sunflora are hidden under certain switches, like the Mime Jr. mission. The layout rewards co-op and forces a specific solo path that involves some backtracking.
Recommended pathing:
First room: Step on the first switch to reveal a Sunflora. At the fork, go right (this is required when playing solo!). Two Combee block the corridor, one of which attacks with gusts. Combee are very easy 10 AP captures, making them a low-risk option for grinding levels, but when going for an A or S rank, avoid them to save time. Avoid Venusaur if you can, as it has high HP.
Second room: Head north, stopping at the small crevice on the right for a time powerup. Gust attacks are tricky to avoid while clearing chests, so bait the attack, move out of its range, then clear the chest immediately.
Third room: Optionally pick up some battery powerups on the right if you need them. This room has the most Combee. A defense powerup and some time powerups are scattered along their paths and are worth the risk to obtain. Note that the exact placement of the powerups depends on the pattern, and can be used to identify the pattern at this stage. Combee's attacks can combo to knock you far back or force captures; since Combee are easy captures, getting one or two Combee first may make it easier to navigate this area.
Fourth room: Ignore the first switch, which just spawns two attacking Combee. Go slightly north and step on the next switch for a Sunflora. Then go left and trigger the leftmost switch to create a platform linking the left and right sides - this is why you must go right in the very first room when playing solo. Cross to the left and step on the northern switch on the left side for another Sunflora. You can optionally head north to sneak past a Swampert/Venusaur for a 60-second time powerup. You can also optionally take the bottom-left teleporter to backtrack for a time powerup; again, the placement and time yield depends on the pattern. Either way, go to the right side in the room with the switch platform, and head north from there. Step on the other switch to spawn a Sunflora, continue north, and next to the boss teleporter, step on one of the switches (depending on your pattern; see below) to spawn the final Sunflora.
Pattern Identification
The correct path and available Pokémon depend on the pattern.
pattern 1 & 2: right: middle 90, top 40/40 & def middle Combee & 90 right
pattern 3: right: middle 90, top 60 & def middle Combee, 60 battery NW combee, 60 time right
In the third room, on the right side, there are two chests immediately to the right of the bottom warp tile: Pattern 1 or 2.
In the third room, on the right side, there is one chest immediately to the right of the bottom warp tile: Pattern 3 or 4.
On a one-chest pattern, the defense powerup is in the middle of the three Combee, on the right side of path: Pattern 3. Near the boss teleporter, the top right switch holds Sunflora.
On a one-chest pattern, the defense powerup is above the three Combee, on the left side of the path: Pattern 3. Near the boss teleporter, the left-side switch holds Sunflora.
On a two-chest pattern, there is a Heracross on the platform immediately southeast of the one with the boss teleporter: Pattern 1. Near the boss teleporter, the top right switch holds Sunflora.
On a two-chest pattern, there is no Heracross on this platform: Pattern 2. Near the boss teleporter, the left-side switch holds Sunflora.
Whether the left-side platforms from the initial left-right split hold Venusaur or Swampert can also be used to narrow down patterns: Venusaur is on 1 and 3, and Swampert is on 2 and 4. However, you may not see these if playing solo since the left-side platforms waste time, unless you do the backtrack discussed above.
Boss
Shoots poison stingers (!): One blast of stingers in the direction it's facing. 7 damage per hit. Impossible to loop around.
Shoots poison stingers (!!): Stingers in multiple batches, which occur as Vespiquen moves around after the initial batch, with about 0.3 seconds between batches. 7 damage per hit. Probably impossible to loop around.
Scatters tornadoes (!!!): Launches three whirlwinds in the direction it's facing. 15 damage per hit. Impossible to loop around.
Poison spheres (!!!): Causes poison spheres to appear at random areas on the stage, which linger for about 2 seconds before being replaced; about 6 spheres total are summoned. Only used after agitation, and can combo into other attacks. 8 damage per hit. Possible to loop around.
S-Rank Tips
This mission can be quite a struggle at a lower level. The hardest part is getting the left-side time powerups without being forced into Swampert/Venusaur captures. The one near the third Sunflora switch is worth it, since it guarantees additional time even if the Swampert/Venusaur catches you. Combee waste time, and if their damage goes unhealed, you can easily run out of Styler energy during the fight with Vespiquen. WarriorGallade recommends clearing this mission early (even a C rank), then returning later with higher levels and upgraded Assists. A maxed Gengar, for instance, makes S-rank far easier (Gastly or Haunter work with less damage).
Partner Choice
Vespiquen moves surprisingly fast, so prioritize an Assist with a secondary effect over one with a type matchup. Piplup's Slow effect is still useful, although its damage output is not incredible. Gengar (WarriorGallade's #1-ranked Assist) is good here with good timing. Froslass and Lucario aren't great. Electric-type Assists with pausing effects can be useful, but like Piplup, have low damage output. Rock-type Assists with a Tired effect (such as Tyranitar, Cranidos, and Rampardos) can deal high damage, although the Tired status doesn't do all that much.


 Icons like this (darker) give the player extra seconds, determined by the number.
 Icons like this (lighter) restore the player's Styler by the specified number of energy.
 Icons like this (DEF) reduce the player's damage taken by 1 (to a minimum of 1).