Gauge


Pidgeotto (20%)

Gloom (5%)

2 (Pattern 5)
Oddish (20%)

Noctowl (7%)


Grovyle (20%)

4 (Pattern 4)
Treecko (20%)

3 (Pattern 3)
Kricketune (20%)

Kricketot (20%)


Check out WarriorGallade's post on this Mission for more specific tips.
| Rank | AP | Slates |
|---|---|---|
| S | 10 | Ivysaur (90%) Tangrowth (10%) |
| A | 7 | Bulbasaur (100%) |
| B | 5 | N/A |
| C | 4 | N/A |
Leafeon is inaccessible when playing solo.
| Pokémon | Quantity | Group | Friendship Gauge |
AP | Slates | |
|---|---|---|---|---|---|---|
|
|
Bulbasaur | 4 | Grass | 180 | 1 | N/A |
|
|
Pidgey | 2 (Patterns 1 & 5) | Flying | 64 | 1 | N/A |
|
|
Pidgeotto | 1 (Pattern 2) | Flying | 360 | 2 | N/A |
|
|
Pidgeot | 1 | Flying | 1,050 | 3 | Pidgeot (80%) Pidgeotto (20%) |
|
|
Oddish | 2 (Patterns 1 & 5) | Grass | 130 | 1 | Oddish (95%) Gloom (5%) |
|
|
Gloom | 3 (Patterns 1 & 3) 2 (Pattern 5) |
Grass | 500 | 2 | Gloom (80%) Oddish (20%) |
|
|
Hoothoot | 3 (Patterns 1 & 5) | Flying | 108 | 1 | Hoothoot (93%) Noctowl (7%) |
|
|
Bonsly | 2 (Pattern 2) | Rock | 140 | 1 | Bonsly (100%) |
|
|
Pineco | 8 (Patterns 2 & 3) | Bug | 400 | 2 | Pineco (100%) |
|
|
Delibird | 1 (Pattern 4) | Ice | 300 | 10 | Delibird (100%) |
|
|
Treecko | 2 (Pattern 2) | Grass | 120 | 1 | Treecko (80%) Grovyle (20%) |
|
|
Grovyle | 2 (Pattern 2) 4 (Pattern 4) |
Grass | 336 | 2 | Grovyle (80%) Treecko (20%) |
|
|
Kricketot | 2 (Pattern 2) 3 (Pattern 3) |
Bug | 200 | 1 | Kricketot (80%) Kricketune (20%) |
|
|
Kricketune | 2 (Pattern 3) | Bug | 500 | 2 | Kricketune (80%) Kricketot (20%) |
|
|
Mothim | 3 (Pattern 4) | Bug | 380 | 2 | Mothim (100%) |
|
|
Carnivine | 8 (Patterns 1, 2, & 5) | Grass | 340 | 2 | Carnivine (100%) |
|
|
Leafeon | 1 (Pattern 5, 2+ players) | Grass | 900 | 3 | Leafeon (100%) |
| Pokémon | Group | Friendship Gauge |
Agitated Gauge |
AP | |
|---|---|---|---|---|---|
 |
Tangrowth | Grass | 2,610 | 226 | 5 |
Text of this section & map image are taken from WarriorGallade's post on the subject, supplemented with information from the official Prima guide book, and condensed/reorganized slightly. Used with permission.
This Mission contains five different patterns of wild Pokémon that can appear. Click a thumbnail below to view that pattern's map.
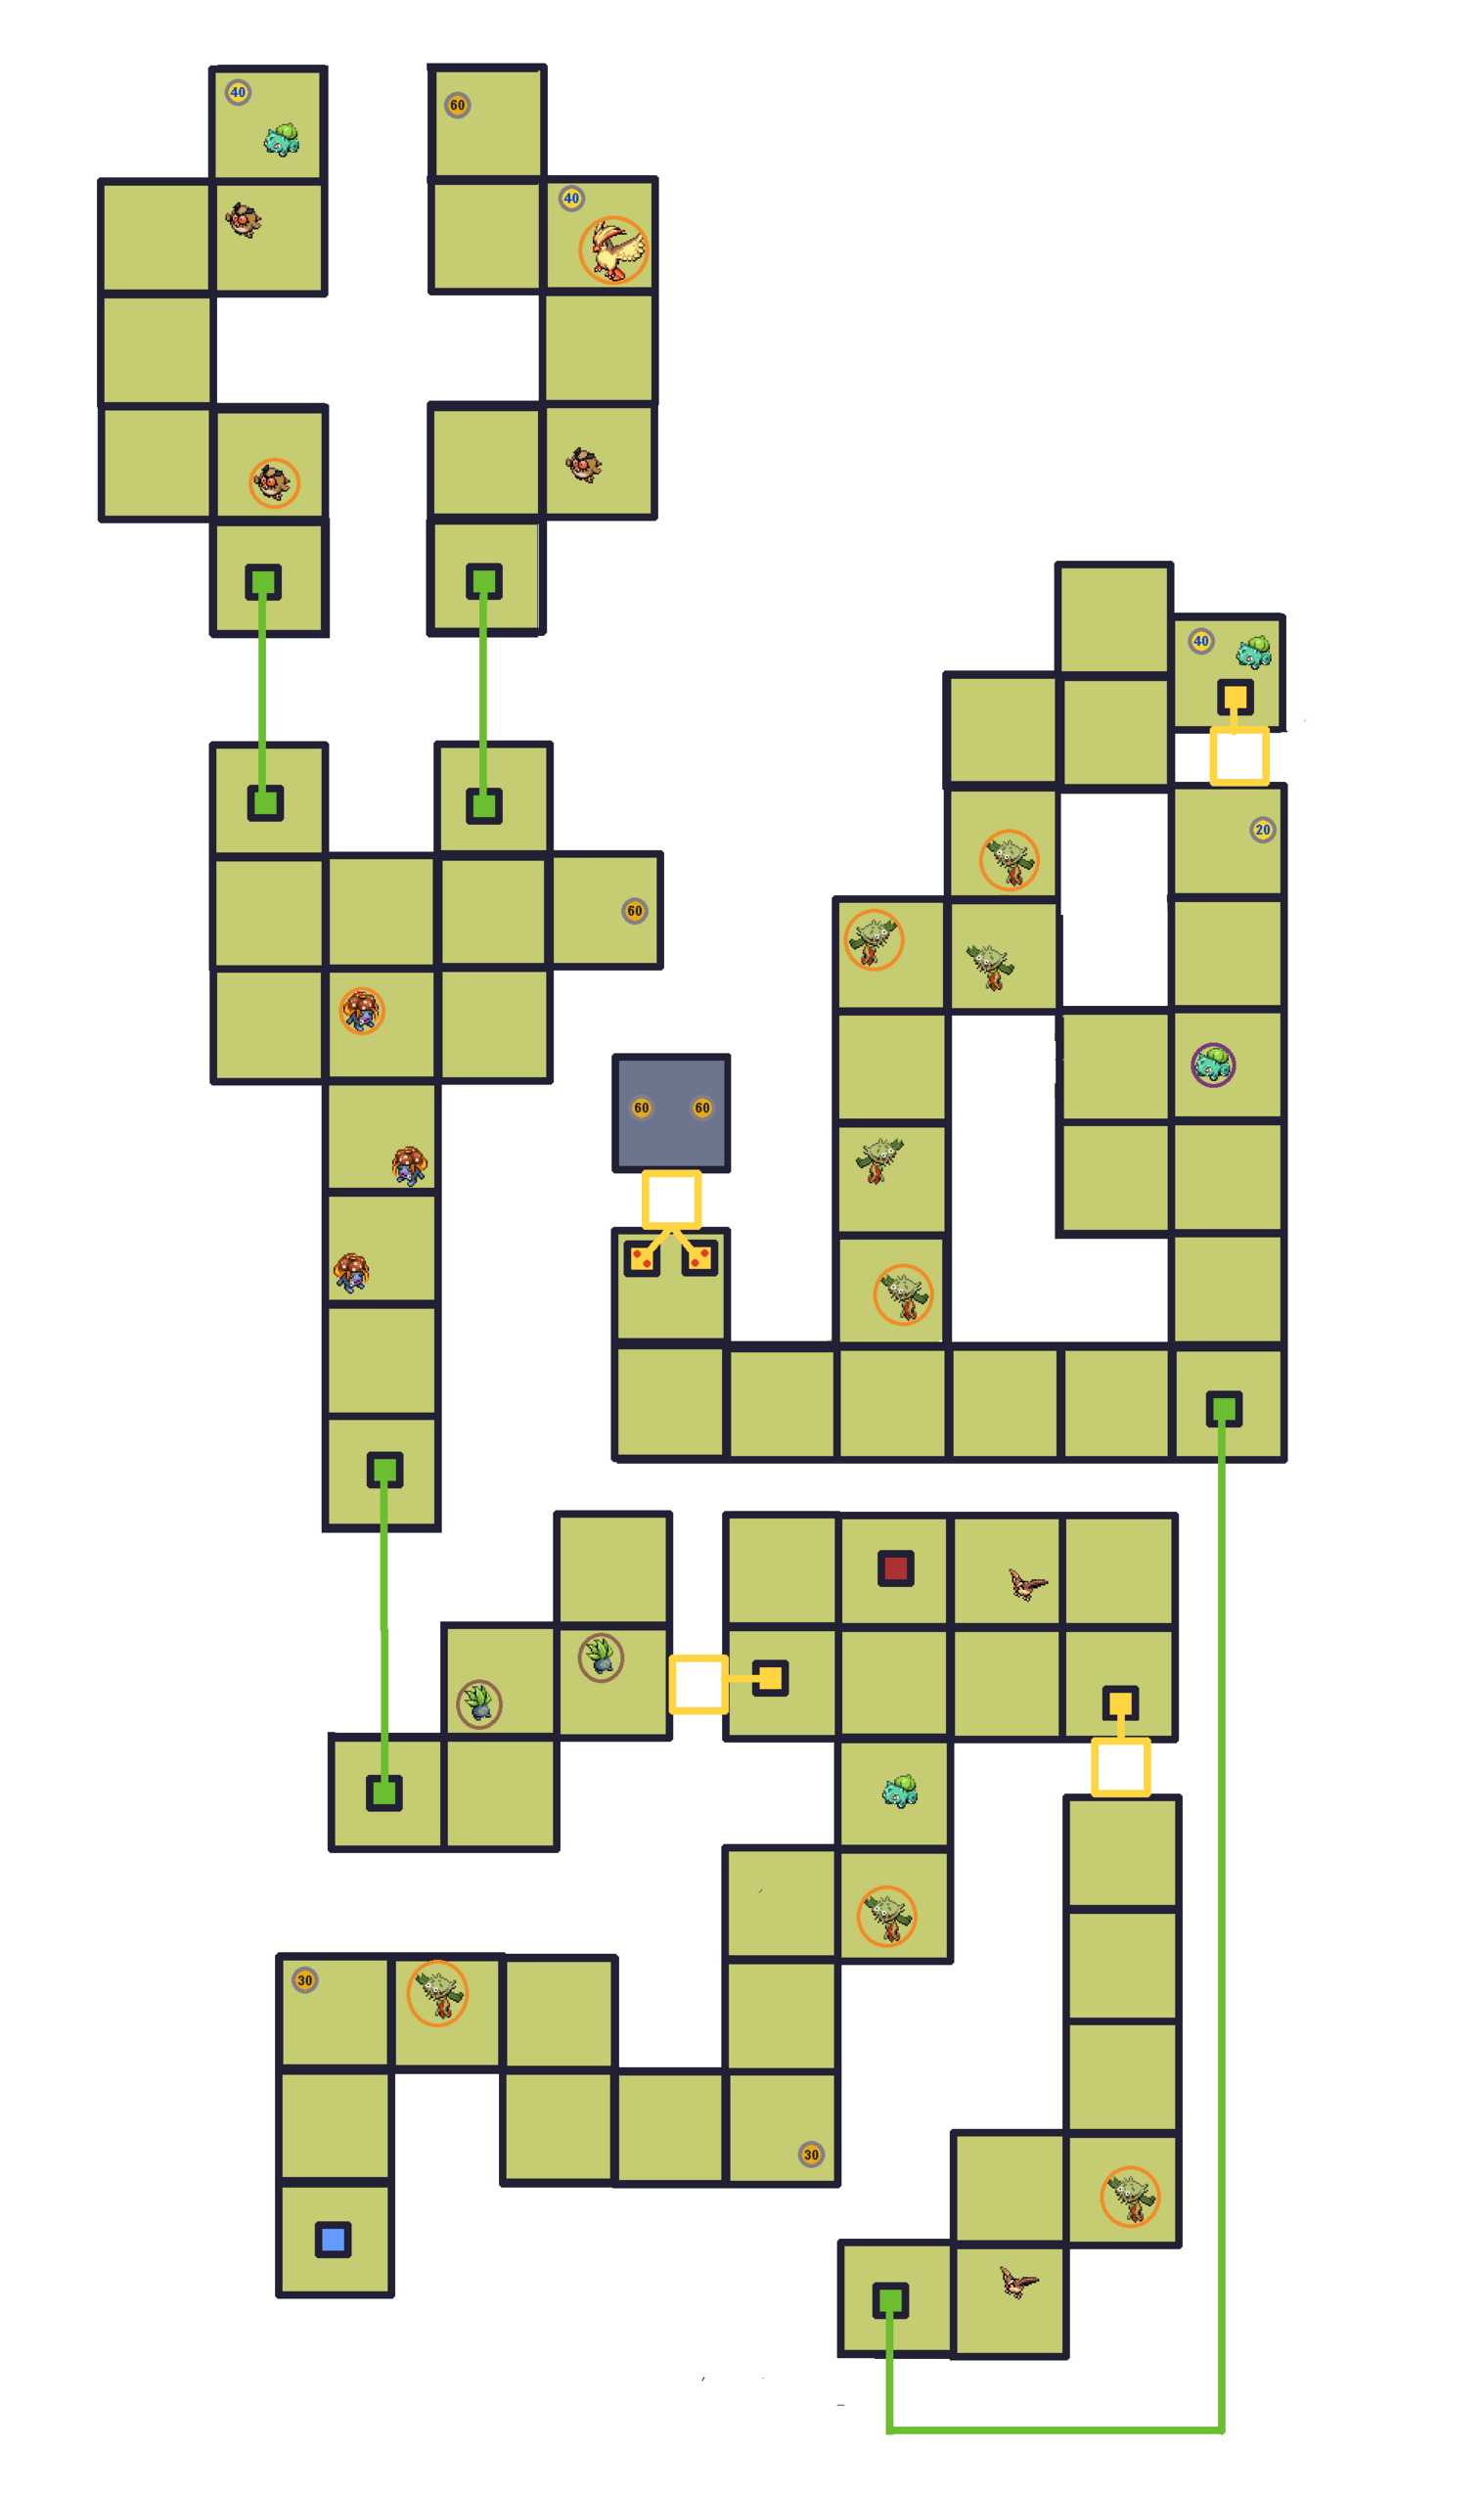
Legend:
 Icons like this (darker) give the player extra seconds, determined by the number.
 Icons like this (lighter) restore the player's Styler by the specified number of energy.
This is the final Forest Temple mission, and it has a maze-like layout requiring some memorization. You probably won't complete it on the first try, but it is a great early grinding spot, especially if you reset for Pattern 4, which includes Carnivine (2 AP) and Delibird (10 AP and the earliest Ice-type assist, though its Slate can't be obtained until clearing the mission). Delibird also recurs in later missions with the same AP bonus.
There are two paths at a fork near the red tile: both must be explored to capture all four Bulbasaur.
Left: Avoid the angry Pokémon, grab the time bonus from the chest, then choose between two teleporters. One has a Bulbasaur, and the other has a time power-up and an angry Pidgeot, which can be a pain to capture at lower levels and waste precious time. If you are trying to move quickly, identify the pattern you are on and go straight for Bulbasaur. Backtrack after capturing Bulbasaur.
Right: Navigate past the Pokémon to the bottom teleporter. Recommended order after taking it: go left, then north through the Pineco/Carnivine hallway to catch the first Bulbasaur, hit the switch to open a path south, then chase the second scared Bulbasaur; positioning yourself so it runs into you saves time. The bottom left part of this part of the map contains a multiplayer-only platform containing Leafeon, which has an excellent Poké Assist if you can get it but requires either multiple players or a cheat code to enable multiplayer-only switches to be used in single-player mode.
In this Mission, the location of one of the Bulbasaur is dependent on the pattern. Going the wrong way leads to a dead end (unless you want the power-ups that are there), wasting precious time. Therefore, identifying the pattern quickly is important for completing the mission quickly.
Additionally, if you are trying to grind on Delibird (which drops more AP than anything else in this mission) or capture Leafeon, identifying Patterns 4 and 5 is also important.
Not feasible yet. Return much later once you can capture Bulbasaur in 3-4 loops, navigate past angry Pineco/Carnivine without engaging them, and have a strong Poké Assist with good range (at level 24, Blaziken worked well).
Piplup and Torchic are both poor choices: type disadvantage and insufficient range, respectively. Pidgey is usable but underpowered; Pidgeotto (if obtainable) hits harder but has a recharge time that doesn't justify the power gain. The best pick is Drapion (grind the first mission for its slate): it's the strongest super-effective Poké Assist at this stage, and its "tired" effect counters pollen-burst stalling. However, its 4-shot scatter pattern requires close range to land reliably, and its long recharge time (~19 seconds) is risky if it gets scared off by the pollen burst while Tangrowth is agitated. Ultimately, this boss, like Sceptile, is best revisited later with a stronger partner, at which point your Styler alone can brute-force (and S-rank) it.