Gauge


Charmeleon (10%)

Charmander (20%)


3 (Pattern 4)


1 (Pattern 2)
Quilava (20%)

Typhlosion (5%)

Typhlosion (20%)
Check out WarriorGallade's post on this Mission for more specific tips.
| Rank | AP | Slates |
|---|---|---|
| S | 20 | Grovyle (90%) Magmortar (10%) |
| A | 15 | Magby (100%) |
| B | 10 | N/A |
| C | 8 | N/A |
| Pokémon | Quantity | Group | Friendship Gauge |
AP | Slates | |
|---|---|---|---|---|---|---|
|
|
Flareon | 2 (Pattern 4) | Fire | 1,200 | 3 | Flareon (100%) |
|
|
Charmander | 10 (Patterns 2 & 4) | Fire | 600 | 2 | Charmander (90%) Charmeleon (10%) |
|
|
Charmeleon | 9 (Patterns 3 & 4) | Fire | 840 | 3 | Charmeleon (80%) Charmander (20%) |
|
|
Tyrogue | 2 (Pattern 3) | Fighting | 364 | 1 | Tyrogue (100%) |
|
|
Hitmonlee | 1 (Patterns 1, 2, & 3) 3 (Pattern 4) |
Fighting | 588 | 2 | Hitmonlee (100%) |
|
|
Hitmonchan | 3 (Patterns 1 & 2) | Fighting | 644 | 2 | Hitmonchan (100%) |
|
|
Hitmontop | 1 (Patterns 3 & 4) | Fighting | 672 | 2 | Hitmontop (100%) |
|
|
Magby | 5 | Fire | 336 | 1 | N/A |
|
|
Magmar | 9 (Patterns 1 & 2) | Fire | 720 | 3 | Magmar (100%) |
|
|
Cyndaquil | 11 (Patterns 1 & 3) 1 (Pattern 2) |
Fire | 288 | 1 | Cyndaquil (80%) Quilava (20%) |
|
|
Quilava | 2 | Fire | 616 | 2 | Quilava (95%) Typhlosion (5%) |
|
|
Typhlosion | 1 (Patterns 1, 2, & 3) | Fire | 1,260 | 4 | Quilava (80%) Typhlosion (20%) |
| Pokémon | Group | Friendship Gauge |
Agitated Gauge |
AP | |
|---|---|---|---|---|---|
 |
Magmortar | Fire | 3,204 | 467 | 6 |
Text of this section & map image are taken from WarriorGallade's post on the subject, supplemented with information from the official Prima guide book, and condensed/reorganized slightly. Used with permission.
This Mission contains four different patterns of wild Pokémon that can appear. Click a thumbnail below to view that pattern's map.
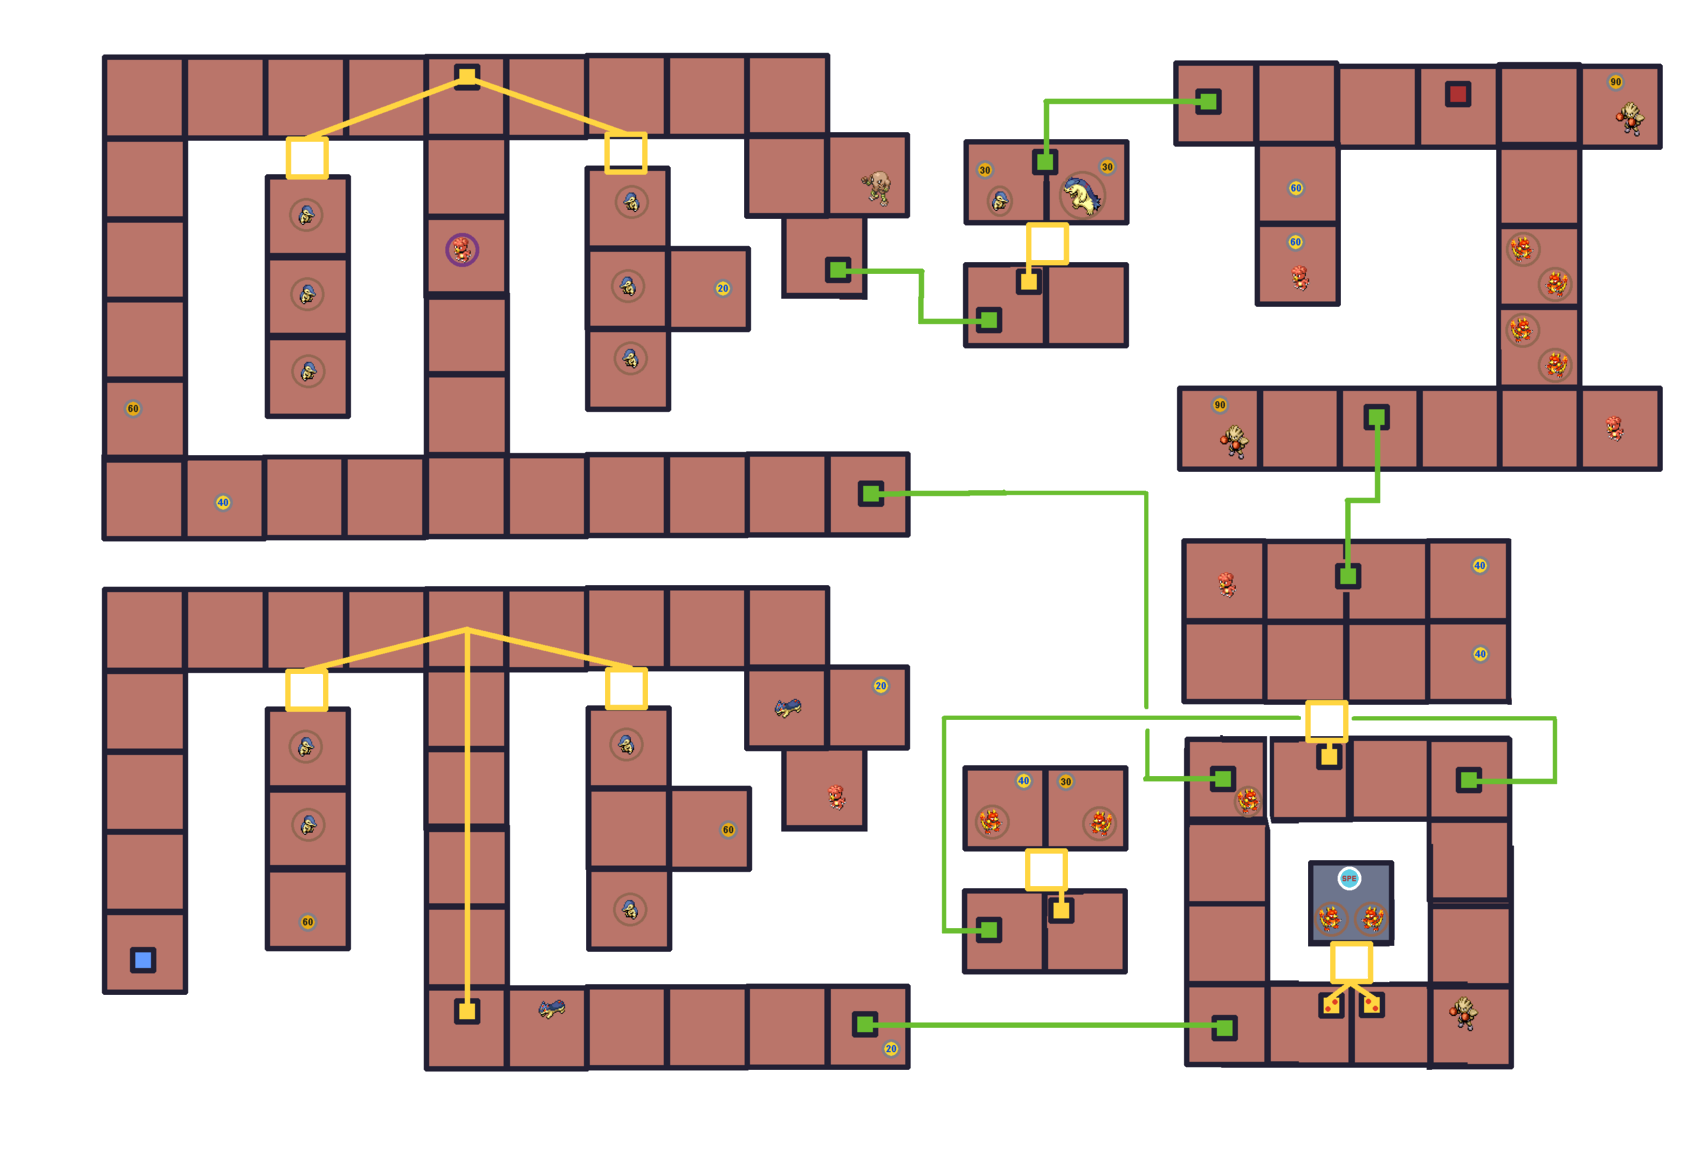
Legend:
 Icons like this (darker) give the player extra seconds, determined by the number.
 Icons like this (lighter) restore the player's Styler by the specified number of energy.
 Icons like this (SPE) increase the player's movement speed.
This level has a large and winding layout with a single "correct path": wrong teleporters cost time. For grinding, Magmar and Charmeleon (each worth 3 AP) are worth capturing despite being challenging. Their attacks target fixed screen positions, rather than following the player, so time your movements around them carefully, especially in the final room. Skip Charmander and Cyndaquil unless you want their Slates.
Pattern IdentificationIn this Mission, two of the teleporter spaces lead to different areas of the map in different patterns. Additionally, Flareon and different Tyrogue evolutions are also specific to different patterns. Unfortunately, however, one of the Magby's locations is dependent on the pattern, but in such a way that the player will not be able to identify which pattern they are on before finding the Magby. The player therefore has a 50% chance of taking the wrong turn and going to a dead-end with a single powerup. At that point, however, the pattern will be identified.
Moderately difficult. Time isn't tight, but the layout takes a few attempts to learn, with possible backtracking depending on stage variation. A first-attempt C rank is likely, with an A rank possible given good routing.
Close-range attacks can be good against Magmortar's single-line attacks, but do not help much against the explosions. Poké Assists with quick recovery time are important here for preventing Magmortar's gauge from depleting significantly as it uses its impossible-to-loop attacks. A Poké Assist that can slow it down makes quick loops during the explosion attack possible.
Piplup remains excellent for its type advantage, long range, and slowing effect. Despite Sandslash's type advantage, its Assist's pattern doesn't suit Magmortar's frequent movement.