Gauge

Crobat (20%)

Graveler (20%)


Teddiursa (20%)


Phanpy (20%)

Hariyama (20%)

2 (Patterns 2 & 3)
Hariyama (20%)

Camerupt (20%)


Hippowdon (20%)

Toxicroak (20%)

Croagunk (20%)
Check out WarriorGallade's post on this Mission for more specific tips.
| Rank | AP | Slates |
|---|---|---|
| S | 20 | Combusken (90%) Blaziken (10%) |
| A | 15 | Mime Jr. (100%) |
| B | 10 | N/A |
| C | 8 | N/A |
| Pokémon | Quantity | Group | Friendship Gauge |
AP | Slates | |
|---|---|---|---|---|---|---|
|
|
Golbat | 2 (Patterns 3 & 4) | Poison | 950 | 3 | Golbat (80%) Crobat (20%) |
|
|
Geodude | 3 (Pattern 4) | Rock | 560 | 1 | Geodude (80%) Graveler (20%) |
|
|
Hitmontop | 3 (Patterns 1, 2, & 4) | Fighting | 672 | 2 | Hitmontop (100%) |
|
|
Ursaring | 2 (Patterns 3 & 4) | Normal | 1,596 | 4 | Ursaring (80%) Teddiursa (20%) |
|
|
Houndour | 2 | Dark | 280 | 1 | Houndour (100%) |
|
|
Donphan | 2 (Patterns 1 & 2) | Ground | 784 | 2 | Donphan (80%) Phanpy (20%) |
|
|
Makuhita | 2 | Fighting | 364 | 1 | Makuhita (80%) Hariyama (20%) |
|
|
Hariyama | 4 (Pattern 1) 2 (Patterns 2 & 3) |
Fighting | 1,890 | 4 | Makuhita (80%) Hariyama (20%) |
|
|
Numel | 7 (Patterns 1 & 3) | Fire | 588 | 1 | Numel (80%) Camerupt (20%) |
|
|
Mime Jr. | 6 | Psychic | 364 | 1 | N/A |
|
|
Hippopotas | 2 | Ground | 504 | 1 | Hippopotas (80%) Hippowdon (20%) |
|
|
Croagunk | 7 (Patterns 2 & 4) | Poison | 494 | 2 | Croagunk (80%) Toxicroak (20%) |
|
|
Toxicroak | 2 (Patterns 2 & 4) | Poison | 1,330 | 3 | Toxicroak (80%) Croagunk (20%) |
| Pokémon | Group | Friendship Gauge |
Agitated Gauge |
AP | |
|---|---|---|---|---|---|
 |
Blaziken | Fire | 3,360 | 415 | 6 |
Text of this section & map image are taken from WarriorGallade's post on the subject, supplemented with information from the official Prima guide book, and condensed/reorganized slightly. Used with permission.
This Mission contains four different patterns of wild Pokémon that can appear. Click a thumbnail below to view that pattern's map.
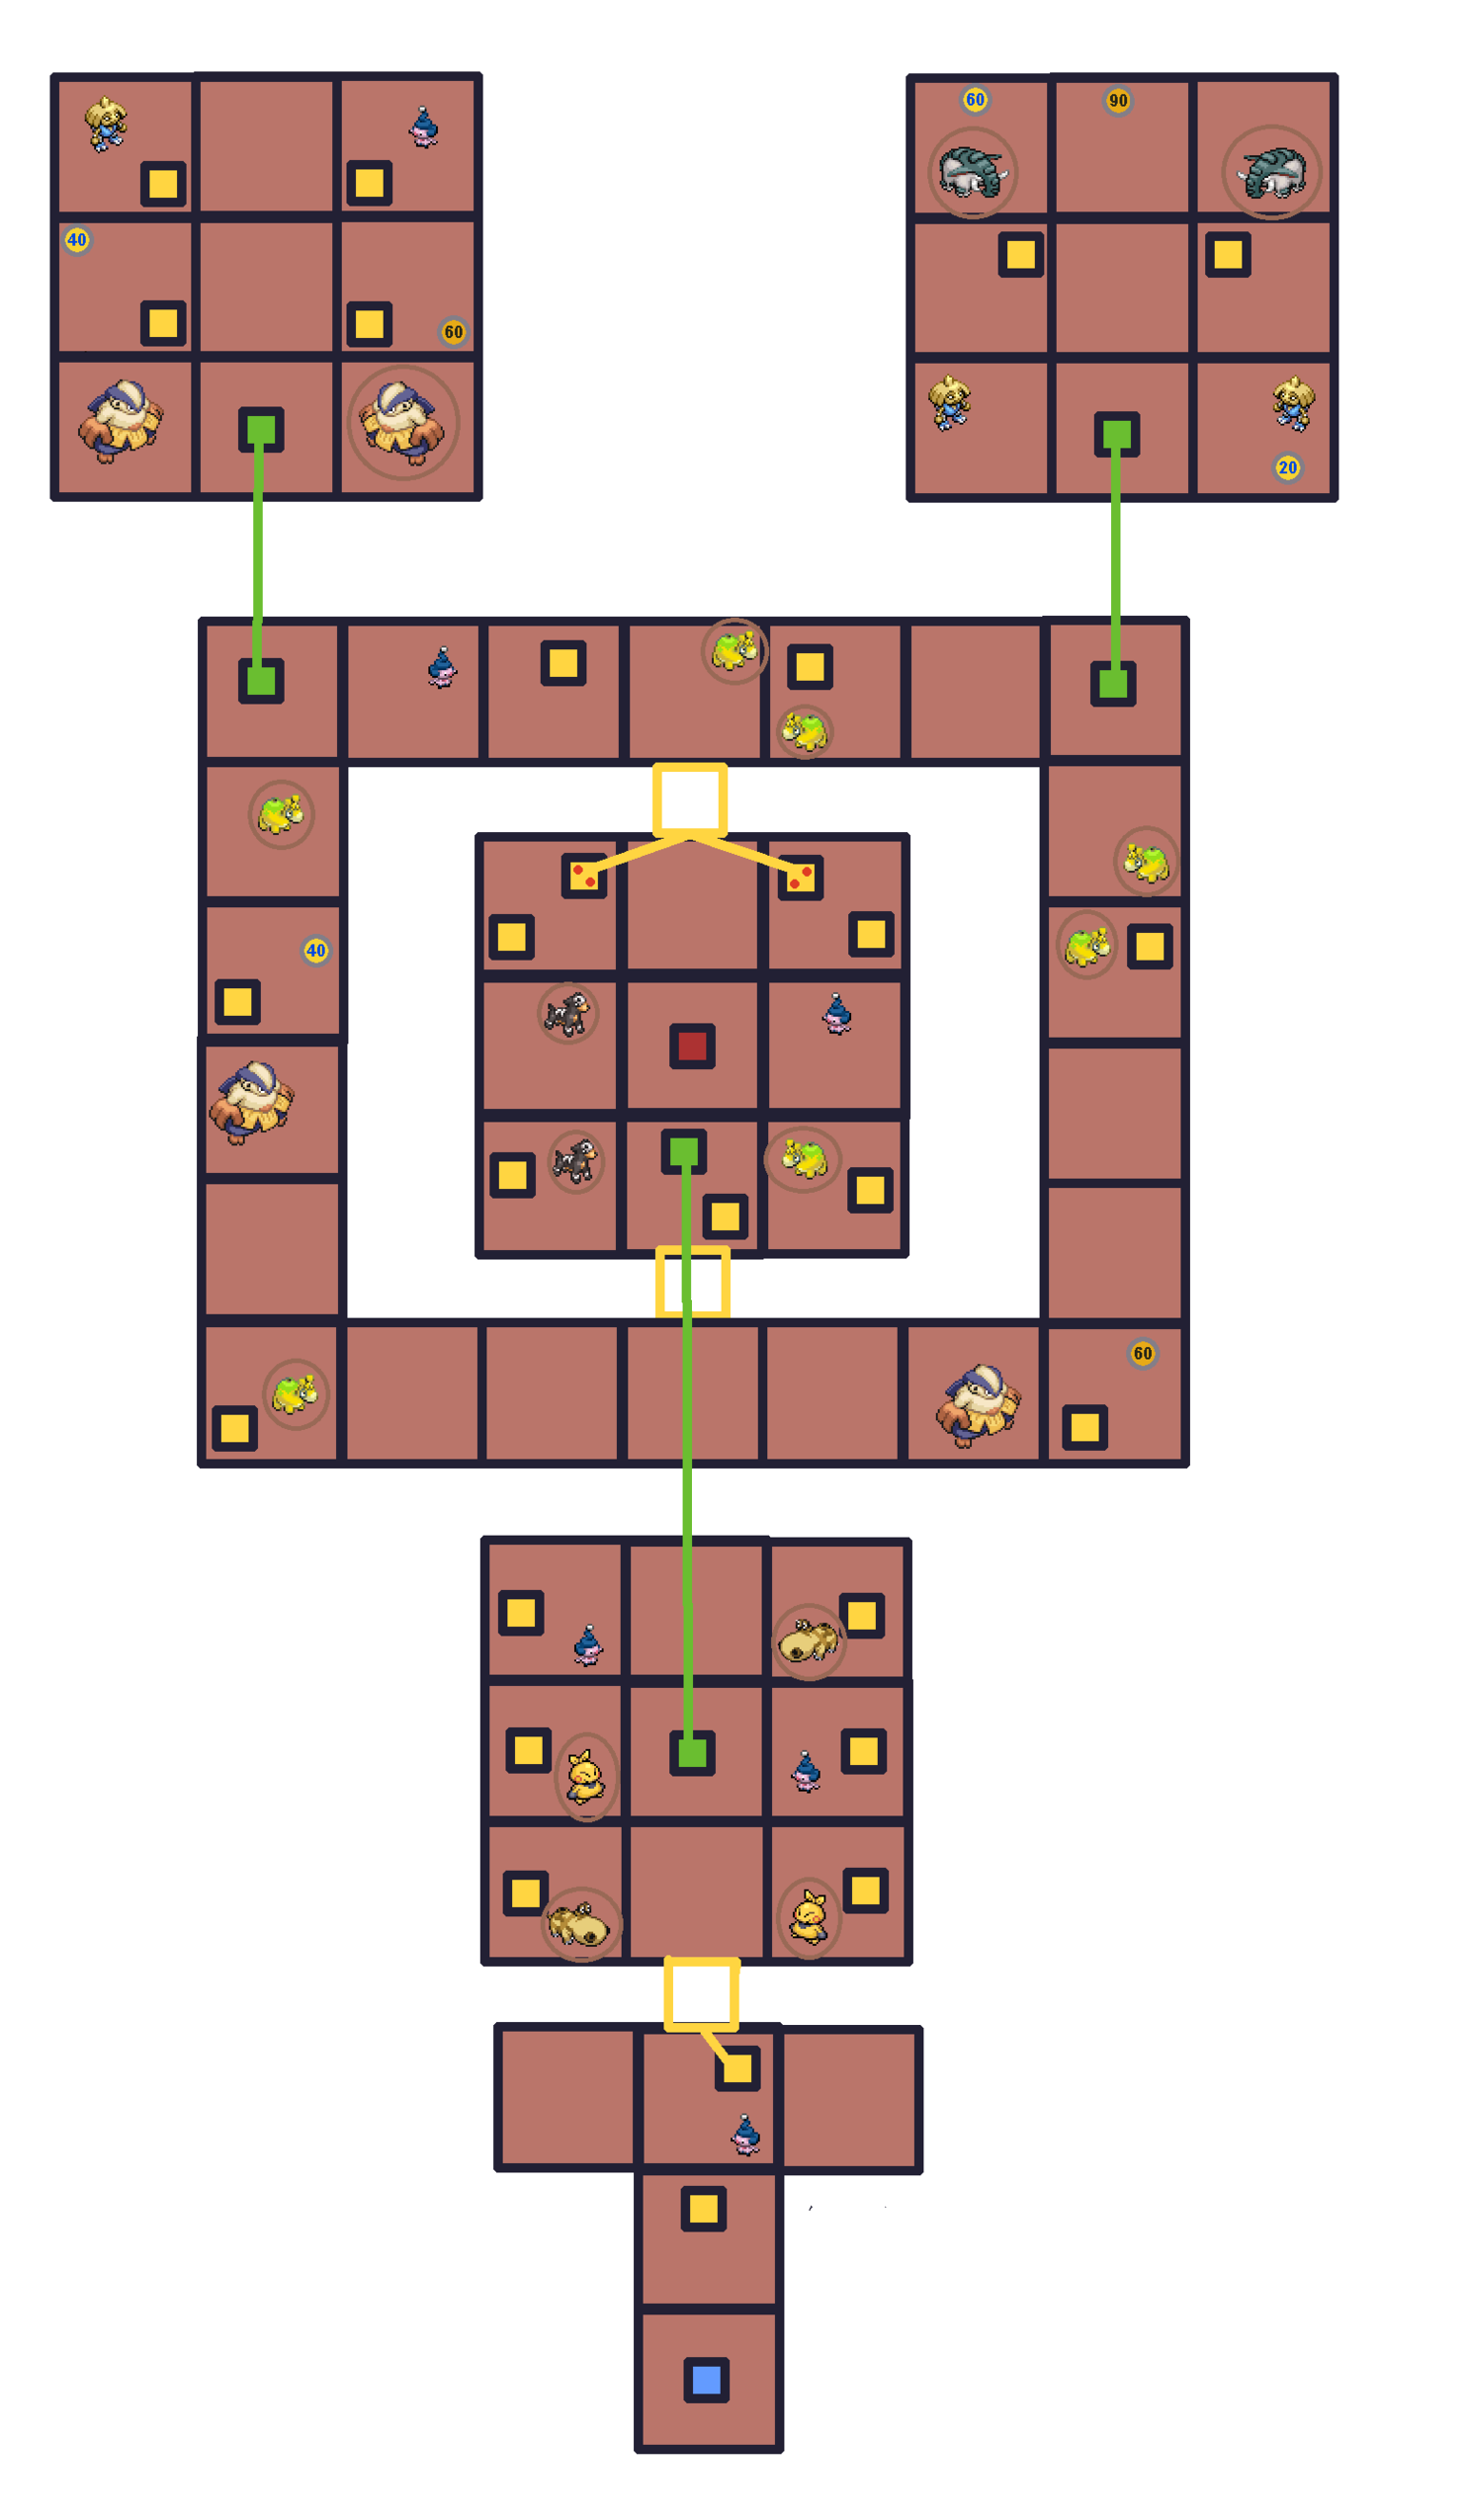
Legend:
 Icons like this (darker) give the player extra seconds, determined by the number.
 Icons like this (lighter) restore the player's Styler by the specified number of energy.
This level expands on the switch-reveal mechanic introduced first in Mission 5: Pidgeotto and the Switch Path. All six Mime Jr. are hidden behind switches. The "easiest" option is simply to step on every switch, but if you want to maximize your time, try to identify the pattern quickly and use the maps above to help determine which switches are necessary. If you do try every switch, be careful not to miss one. If a wild Pokémon attacks after you step on a switch with Mime Jr., the Mime Jr. will take a few seconds to appear after finishing the battle, so be aware of that so you don't wander off! The narrow pathways here offer good routing practice for tougher future missions.
For AP farming, this mission allows lots of opportunities to capture non-necessary Pokémon while still achieving an S rank, as long as you're able to have your partner avoid Blaziken's attacks. Good AP targets are Croagunk (2 AP, efficient), Toxicroak (3 AP, less efficient), and Hariyama (4 AP, worth it). Donphan takes too long.
Pattern IdentificationIn this Mission, the switches that yield Mime Jr. are different depending on the pattern. Picking the wrong switch causes an angry Pokémon to appear which can waste time or health as it attacks.
An S-rank on the first try is very possible if you get all the Mime Jr. quickly (or check your pattern) and use your assist often and effectively against Blaziken.
Piplup again is excellent: its slowing effect is good against Blaziken's agility and it of course has a type advantage.